最近更新时间: 2003/10/02
原理
:什么是 WWW 与网址( URL )
:Client 如何向 Server 要求数据
:有哪些类型的 WWW 网站?什么是 LAMP
:SSL 与 CA 的认证机制
套件安装
:RPM 安装 LAMP 方式
:Tarball 安装 LAMP 方式 ( Apache 2.xx 2003/09/10 前 )
:升级与安装方式的选择建议
主机设置
:LAMP 的套件结构与主机规划
:基本要求
:最简易 Apache 设置(含关于中文显示之设置)
:启动 httpd (如何关闭 https )
:测试结果
:用户的个人网页启动
高端安全设置:1. CGI ( Perl 文件 ) 之运行、Index 显示、查无网页显示之设置
:2. 抵挡 IP 与限制用户动作的设置(allow, deny, limit)
:3. 主机状态说明网页设置
:4. 关于权限的意义说明与设置
:5. 设置认证网页
:6. .htaccess 文件与 AllowOverride 的用途
:7. 防火墙
注册表分析与其重要性:
:1. syslog 与 logrotate
:2. Web Analyser
虚拟主机架设:
客户端的文本接口 Web 功能:
增强 PHP 代码运行速度的模块:
:MM Cache
:Apache 的性能测试
砍站软件与 Nimda 病毒的抵挡 scripts:
安装 phpBB2 讨论板:
问题讨论:
:1. 关于显示中文的额外说明:
:2. 关于无法运行 PHP 的说明:
:3. 关于 MySQL 的问题说明:
:4. 关于启动 httpd 时出现的 perl 问题:
课后练习:
原理:什么是 WWW 与网址
- WWW 是 World Wide Web 的缩写,其中, Web
有广播网的意思存在,所以,简单的说,WWW就是万维网,可以结合文本、图形、图像及声音等多媒体,并通过
超链接 ( HyperText ) 的方式,将信息通过 Internet 传递到世界各处!那 WWW
的数据是如何传递的呢?
- 协定:包括 http, ftp, news, gopher, telnet 这几种常见的方法! 其中呢,http 是利用『主机的 http port ,通常为 80 』,至于 ftp 这个方法则是利用『主机的 ftp port ,通常为 21 这个端口口』,请注意喔,我们使用的 80 与 21 都是主机所提供的服务喔!而不是我们 client 端的 port ㄋㄟ,所以,使用 http 与 ftp 连上同一部电脑,所取得的信息并不见得会一样,因为服务本身就不同嘛!一个是 WWW 一个是 ftp 怎么会相同。此外,如果你没有指定协定的话,那么缺省的协定就需要看客户端 ( Client ) 使用的那个连接程序的缺省协定了!举个例子来说,如果你是使用 Netscape 的话,呵呵!那么缺省的协定就是 http 啰,因此,你在网址列输入 tw.yahoo.com 时, Netscape 立刻就会以 http 来连接出去啰! ^_^;
- 主机地址:刚刚才提过的 FQDN 应该还没有忘记吧!由于电脑仅认识 IP ,所以,如果你输入 IP 的话,同样的可以连接喔!但是,如果是输入主机名称 ( domain name ) 的话,那么你就必需要让该主机名称可以经由转译器得到对应的 IP 喔!转译器是什么?就是 /etc/hosts 或者是 /etc/resolv.conf 里面的设置啊!当然,对外提供正常的 WWW 服务时,你的 host name 就必需要让大家可以转译到 IP ,就需要去申请一个合法的领域名称啰! ^_^
- 目录资源:其实这个是 Uniform Resource Indicator, URI 的意思,如果你要去的网站网页在主网页的目录底下,那么你可以直接输入目录与网页的名称,就可以直接取得那个页面的数据啰!此外,如果你只输入网址而已呢?并没有输入网页名称呢?那么在 Server 端将会自动的判断 ( 看 Server 自己的设置而定 ) 该目录下是否有设置中引用的网页名称啰!这个在底下我们会再次的提到喔!
- :port:一般而言,各个协定都有其独特的使用的 port ,例如众所皆知的 http 使用的是 80 而 ftp 使用的是 21 这些个 port,所以,当你要连接到某个网站时,输入 http://that.host.name 就会主动的利用 80 那个 port 来尝试连接到对方主机!但是如果你不想要使用该 port 呢?举个例子来说,假如你的网站使用的是 8080 这个 port 来进行 WWW 的服务,果真如此的话,那么除非你有进行防火墙内的 port 对应,否则直接在网址列输入 http://your.host.name 结果将无法连接到你的 WWW 服务器,因为他会主动的连接到 80 那个 port 呐!所以,我们就要告诉浏览器,要向 Server 要求服务的是哪一个 port ,因此,你就要将他写成: http://your.host.name:8080!才可以连接到对方的 8080 那个 port 喔!
- Client 端先经过 DNS 解析得到 WWW 主机的 IP ,然后会发出一个数据封包,以 http 这个协定( 或方法 )联系到 WWW 主机,告知 WWW 主机我们要以 http 的方法来取得数据,同时,这个时候使用的是 TCP 协定,亦即需要经过三向交握的过程喔;
- WWW 主机收到这个数据封包之后,会根据 Client 端的要求,提供相关的消息来回应,大部分的情况下皆是使用 http 的协定发送具有 HTML 语法的网页数据到 Client 端的浏览器上;
- 最后 Client 端的浏览器将 HTML 的语法经过解析后,以相关的画面来显示到屏幕上,提供用户来观赏喔!
- GET:这是最常见的,就是 Client 端向WWW 主机要求的资源,也可以看成 Client 端向主机取得的数据;
- HEAD:主机端回应给 Client 端的一些数据档头而已;
- POST:Client 端发送到 WWW 主机端的数据;
- OPTIONS:主机端回应给 Client 端的一些允许的功能与方法;
- DELETE:删除某些资源的举动。
- 仅提供用户浏览的网站:这种类型的网站大多是提供『静态』的网页,或许有提供一些动画图标,但基本上就仅止于此啦!因为他仅提供你来浏览,Server 不需要与 Client 端交互,所以你可以到该网站上去浏览,但是无法进行进行数据的上传喔!目前主要的免费虚拟主机大多是这种类型,所以,你只要依照 HTML 的语法写好你的网页,并且上传到该网站空间上,那么你的数据就可以让大家浏览了!
- 提供与用户交互接口的数据库网站:这类型的网站可就多采多姿啦!因为他提供了与用户交互的数据库软件,因此,用户可以依据主机提供的服务,来进行留言、数据上传、访问的服务。由于 Server 与 Client 是交互的,因此一个接口良好的『数据库软件』就相当的重要!因为他可以在线即时来更新用户所传递的数据消息!这方面的网站例如最简单的留言版、讨论区、phpBB 架站论坛、phpnuke 架站论坛、金流与物流的商业型网站等等,都是属于这种交互类型的主机喔!
- WWW 运作的主要软件:(目前有 Apache 与 IIS 两大系统)
- 数据库软件:(例如 MySQL, MS 的 SQL, 及其他相关的数据库)
- 编写网页的网页语言:(例如 shell scripts, perl scripts, Java, PHP CGI 等等)
- Apache :在 1995 年之前就有蛮多的 Web 架设服务器软件的出现,不过,真正到了 1995 年之后,由国际超级电脑应用中心 ( National Center for Supercomputing Applications, NCSA ) 主导并克服了一些 Web 主机的臭虫之后,才让这个 http 协定的 WWW 套件得到了更广泛的应用!而因为这个发布的版本是来自于一些臭虫的克服,因此,这个 WWW 套件被戏称为『 A patchy server 』,意思就是说,一个经过更新后的 Server 的意思!后来,因为要将名字确定下来,干脆就直接取其谐音,用『 Apache 』,这也就是我们要介绍的 WWW 软件啦!
- PHP:官方的说法为:『PHP is a tool that lets you create dynamic web pages. PHP-enabled web pages are treated just like regular HTML pages and you can create and edit them the same way you normally create regular HTML pages.』所以说, PHP 可简单的视为一种编程语言,可以用来设计留言版、讨论区、或聊天室等等的动态网页的咚咚!由于他具有免费、跨平台、易学及效率高等等的优点,目前算是很盛行的一种设计网页的咚咚啦! ( 基本上,PHP是使用来设计网页的编程语言,当然其功能不只如此!你可以轻易的在市面上找到相关的书籍喔 )
- MySQL:将官方网站上的翻译文档中这么说:『MySQL是一个真正的多用户、多线程SQL数据库服务器。SQL(结构化查找语言)是世界上最流行的和标准化的数据库语言。MySQL是以一个客户机/服务器结构的实现,它由一个服务器背景运行程序mysqld和很多不同的客户程序和库组成。SQL是一种标准化的语言,它使得保存、更新和访问信息更容易。例如,你能用SQL语言为一个网站检索产品信息及保存顾客信息,同时MySQL也足够快和灵活以允许你保存记录文档和图像。MySQL 主要目标是快速、健壮和易用。』简单一点来说,这个东西就是一个数据库软件啦!例如:你在设计讨论区的时候,由于讨论的文章会日渐增多,因此就会有所谓的数据库处理的情况,MySQL 的目的就是在处理你这些由用户端发送来的数据。当然,其功能还不只此,我这里仅说一些我们可能用的到的咚咚!
如果你常上网浏览的话 ( 不论是使用 Mosilla 、IE 或是 Netscape ),你应该会知道,台湾有个蛮有名气的门户网站:奇摩雅虎站 ( tw.yahoo.com ),所以你只要在网址列上面输入『 http://tw.yahoo.com 』就可以浏览到奇摩雅虎的网页信息啰!这个『 http://tw.yahoo.com 』就是所谓的 URL ( Uniform Resource Locator ) ,其中 tw.yahoo.com 就是所谓的主机名称,亦即是我们前面刚刚提过的 DNS 里头的 FQDN ( Fully Qualified Domain Name ) ,即是主机名称加上领域名称所得的一个独一无二的 Internet 上面之名字啦!由于电脑在网络里面仅认识 IP 而已,所以,奇摩雅虎站的真实 IP 就是通过 DNS 解析 tw.yahoo.com 而找到这部电脑,然后经过 WWW 的协定功能将数据传到你的眼前来!那么有哪些格式的 URL 呢?呵呵!整个来说,网址列可以输入这些咚咚:
<协定>://<主机地址>[:port]/<目录资源>
举个例子来说,我们通常去到中山大学的 FTP 网站都是以 Web 接口进入的,因为可以直接以浏览与搜索的功能去捉取数据,因此,这个时候我们可以在网址列输入:『 http://ftp.nsysu.edu.tw 』以进入 WWW 接口的 FTP 网站!请注意,是 WWW 接口喔!那么如果我想要直接以 FTP 的模式来进行数据的浏览与传输呢?呵呵!直接在网址列输入以 ftp 为方法的网址:『 ftp://ftp.nsysu.edu.tw 』呵呵!是否发现两者显示的咚咚不太相同?!没错啦!那就是因为我们所连接的主机的协定不一样的缘故,所以主机回应的数据当然就不同啦!请特别留意这种网址列的格式喔!
Client 如何向 Server 要求数据:
那么 WWW 是通过什么样的协定来传达数据的呢?呵呵!没有看到网址列的 http 吗?对啦! WWW 就是使用所谓的 http 这个协定来发送数据的,HTTP 即是 HyperText Transfer Protocol 的简写,亦即是目前 WWW 的数据传递主流协定啦!而在网站上面供人浏览的网页,则大部分需要符合 HyperText Markup Language (HTML) 的语法啰!也就是说,当我们在网址列输入主机的网址之后:
这就是主要的流程啦,不过,Client 传到到 WWW 主机,与 WWW 主机回应的消息里面,可包含有哪些可能的动作呢?
大致上就有这些功能,当然啦,最主要的就是 GET 这个功能啦!毕竟我们连上 WWW 主机就是为了要取得他的数据嘛! ^_^。要记住的是,因为未来我们可能会去分析网站上的数据,所以,你必需要了解一下什么是 GET 或 HEAD 等等的意思!不然很多东西很难理解喔! ^_^
有哪些类型的 WWW 网站?什么是 LAMP?
刚刚前头我们提到的都是关于 Client 端相对于 Server 端求取数据方面的问题,那么再来要谈的,是『咦!到底有哪些主要的 WWW 主机操作系统与软件之搭配呢?』呵呵!问的好!在回答这样的问题之前,我们先来讨论一下, WWW 主机的主要类型好了。基本的类型我们可以分为两种:
呵呵!这么看起来的话,似乎动态网页比较精彩喔!因为他可以跟用户交互,也就更增加 WWW 主机的可变性与灵活运用之性质!所以啰,有办法的话,当然是选择动态网站的 WWW 主机架设比较好啰!那么动态网页的 WWW 主机需要些什么呢?就如同刚刚我们提到的,最重要的是那个可以随时更新数据的『数据库软件』所提供的信息,来与用户交互,因此,一定要有数据库软件喔!再来,只有数据库,没有访问接口来沟通 Server 与 Client 端的数据传递当然还是无法直接在 Web 接口上面访问数据库的内容啦!因此,我们还需要一个『网页编程语言』来进行这个接口的编写哩!当然啦,最主要的还有就是需要 WWW 运作的软件啦!所以你需要:
那目前有哪些主流的个人动态 WWW 主机系统呢?大致上可以分为两种:一种是 Windows 系统的 IIS + MS 的 SQL + ASP WWW服务器,这种 WWW 主机架设上蛮容易的,不过由于 Windows 的某些特性,所以很容易被 Cracker 所破坏;另外一种则是 Linux 系统上面的 Apache + MySQL + PHP 的 WWW 服务器 ( 简称 LAMP ) ,这种服务器架设上有一定程度的困难度,尤其在升级与维护的方面,但是运作妥当的话,他的硬件要求、性能、安全性等方面,则相对的较佳喔!我们这里本来就是练习 Linux 的嘛!因此底下鸟哥将针对 Linux 系统上面的动态 WWW 主机进行介绍,当然啦,主角是 WWW 套件的 Apache 啦!至于需要了解的是: PHP 与 MySQL 分别是两个独立于 Apache 的套件,因此要让 Apache 这个 WWW 软件能够激活 PHP 与 MySQL 的功能,就必需要启动 Apache 里面的 PHP 与 MySQL 的模块啦!首先,不能免俗的,我们还是得分别介绍一下 LAMP 里面各个小东西的说明:
SSL 与 CA 的认证机制:
我们在前头有提过关于 HTTP 使用在传输上面的协定仍然是以 TCP/IP 为准,他传输的时候是使用明码来发送的,也就是说,在 Internet 上面流窜的 WWW 数据,基本上,都是以没有加密过的形式在发送数据!那么,当有些有心人士,利用 TCP Listen 的功能,即可将 Internet 上面的数据封包捉下来进行解析,并可能进一步取得该数据封包内的信息!『嗄!这有什么了不起,不过就是 WWW 信息而已,又不像 SSH 这种远程连接服务器的重要!』嘿嘿!这您可就有所不知了。要晓得的是,我们的网站并不涉及金流及物流的信息,所以当然没有什么『隐密性』可言,但是,如果今天换成是一个交易网站呢?例如网络书店的信用卡交易,例如一些金融公司提供的网络交易行为!这些消息当中,很多都是含有相当重要的私人消息ㄋㄟ~例如信用卡、身份证等代表个人的证号。万一被人截取,呵呵!那可不是闹着玩的!所以啰,这个时候就需要有『数据加密』的动作了!目前用在 WWW 上面的主要加密功能,有 Secure Socket Layer ( SSL ) 及 Certificate Authorities ( CA )两个主要的模式。
Secure Socket Layer ( SSL )
不晓得您是否还记得我们在 远程连接服务器 里面提到的关于 SSH 这个服务器的连接过程!?也就是利用 Server 提供的 Public Key 并配合 Client 端随机产生的 Private Key 来组成一组加密( Public Key )与解密( Private Key )的方法!呵呵!这个方法同样的也被运用于 WWW 主机的设置啦!而支持这个 WWW 主机进行 Public 与 Private 加密的套件,就是很多时候都被拿出来使用的 OpenSSL 这个好家伙了!所以啰,要让你的 WWW 具有 SSL 加密的功能,就必需要安装 OpenSSL 这个套件才成呐!基本上,当 Client 端要向 Server 端求取数据的时候,则利用 Server 端本身提供的 Public Key 及 Client 端随机产生的 Private Key 组成一组可供利用的密码组合!则数据由 Server 发送到 Client 端之前,会先经由 Server 的 Public Key 将数据封包加密,而到了 Client 之后,才经由 Private Key 将数据解密!所以,当数据在 Internet 上面跑时,他是加密过的数据封包喔!即使被人劫取下来,他不晓得 Public 与 Private ,那么要解密可能也得费上几天几夜,甚至是好几年的功夫ㄋㄟ!因此,数据就会比较安全啦!当然啦,以我们这种主要以分享为主的网站,自然不需要使用这种技术!反正数据本来就是 Open 的! ^_^
Cerificate Authorities ( CA )
CA 这个方法同样也是使用 Public 与 Private Key 的方式, ( 呵呵!我们可以说,目前加密与解密的行为大部分都是使用这种类似的观念来进行的啦! ) 由于 SSL 使用的 Public 是 WWW Server 自行创建与产生的,所以具不具有公信力我们还不是很清楚!万一你连上去的 WWW 网站是个骗人的集团创建的,那么有没有加密对你而言,不都是粉危险的吗?咦!那么是否可以通过第三公证人来查验这个 Server 的 Public Key 呢?呵呵! CA 这个方法就是要达成这个目的啦!基本上, CA 是一个公认的合法组织,他可以用来查验 WWW Server 提供的 Public Key 是否合法!以保障 Client 者的权益。因此, CA 是要钱的喔!
我们这里对于 SSL 及 CA 这两个咚咚仅提及他的概念,底下的文章并没有提到要怎么制作!有兴趣的朋友得自行到相关的网站去查找喔:
套件安装
- 好了,终于提到了我们要安装的 LAMP 的地方啦!如何安装 LAMP 呢?基本上仍然是有两种方式的,一个是
RPM 另一个就是 Tarball 啦!详细的观念请参考
鸟哥的 Linux 私房菜--基础学习篇 里面的RPM
与 Tarball 这篇文章吧!请仔细的阅读喔!因为两种方法安装上的难易度差异性很大,而且众所皆知的,
RPM 的文件与 (1)Linux 发行厂商与版本 (2)及其他相依套件 之间有很大的相依性,所以你不能随便的拿网络上得到的
RPM 文件来安装!但是 Tarball 又很难安装完整!唉~真是两难!底下我们分别以
RPM 与 Tarball 的安装来说明!在 RPM 方面,我们分别以 Mandrake
9.0 与 Red Hat 9 的 Apache
+ MySQL + PHP 来说明,其中 Mandrake 提供的是 Apache
1.3.xx 版本,至于 Red Hat 9 则是提供 httpd-2.xx
版本
( 注:Apache 这个套件在 2.x 以后的版本当中,套件名称已经改为
httpd 了,原来的 1.3.xx 版本则是以 apache 为套件名称喔!)至于
Tarball
的方式,则都以最新的 Apache + MySQL 及 PHP ( 2003/09/10 )来安装啦!如果您还是希望以
Apache 1.3.xx 版本来安装您的 LAMP 时,那么请参考这篇: LAMP
的安装方法(https://vbird.org.cn/linux_server0360apache-1.php)。底下的
Tarball 安装方式仅适合 Apache 2.xx 版喔!不要搞错啰! ^_^
- 相关的函数库安装:
- libmm1-1.1.3-10mdk.i586.rpm
- libmm1-devel-1.1.3-10mdk.i586.rpm
- libmm1-static-devel-1.1.3-10mdk.i586.rpm
- PHP 安装:
- php-common-4.2.3-1mdk.i586.rpm
- php-4.2.3-1mdk.i586.rpm
- php-devel-4.2.3-1mdk.i586.rpm
- php-imap-4.2.3-1mdk.i586.rpm
- t1lib1-1.3.1-6mdk.i586.rpm
- php-gd-4.2.3-1mdk.i586.rpm
- MySQL 安装:
- libmysql10-3.23.52-1mdk.i586.rpm
- MySQL-client-3.23.52-1mdk.i586.rpm
- MySQL-3.23.52-1mdk.i586.rpm
- php-mysql-4.2.3-1mdk.i586.rpm
- Apache 安装:
- apache-common-1.3.26-6mdk.i586.rpm
- apache-conf-1.3.26-3mdk.i586.rpm
- apache-modules-1.3.26-6mdk.i586.rpm
- apache-1.3.26-6mdk.i586.rpm
- apache-manual-1.3.26-6mdk.i586.rpm
- libgdbm2-devel-1.8.0-18mdk.i586.rpm
- libdbtcl3.3-3.3.11-11mdk.i586.rpm
- libdb3.3-devel-3.3.11-11mdk.i586.rpm
- db1-devel-1.85-8mdk.i586.rpm
- apache-devel-1.3.26-6mdk.i586.rpm
- mod_php-4.2.3-1mdk.i586.rpm
- mod_perl-common-1.3.26_1.27-7mdk.i586.rpm
- apache-mod_perl-1.3.26_1.27-7mdk.i586.rpm
- Apache 的相关套件
- httpd-2.0.40-21.5
- httpd-devel-2.0.40-21.5
- httpd-manual-2.0.40-21.5
- MySQL 的相关套件
- mysql-3.23.56-1.9
- mysql-devel-3.23.56-1.9
- mysql-server-3.23.56-1.9
- PHP 的相关套件
- php-4.2.2-17.2
- php-devel-4.2.2-17.2
- php-mysql-4.2.2-17.2
- 直接 mount 你的 CDROM ,不会 mount 我可是会 K 人的喔! ^_^:例如『mount -t iso9660 /dev/cdrom /mnt/cdrom 』;
- 然后以 find 搭配 grep 来找出相关的 php, apache, 或 mysql 的字眼,注意到, mysql 有时候会有大写,有的套件仅要小写即可!都不太一样啦:例如『 find /mnt/cdrom -type f | grep -i php 』将数据都给他找出来啦!
- 最后就一个一个的装上去,不过,这里会出现很多的问题,那就是各个套件的属性相依的问题啦!这个时候怎么办呢?没办法啦,就只有将需要的相依属性的文件一个一个的装上去啰!还要再找出来其他的文件来装的意思啦! @_@
- Apache:目前 Apache 已经出到了 2.0.X版,但是最广泛使用的还是属于 1.3.X 版本。你可以上 Apache 主网页去看看相关的信息:
- PHP:目前最新的是 4.3.3 版 ( 2003/09/10 ) ,你可以上 php 的主网页去看看一些相关的咚咚喔!
- PHP 主页 ( 英文 ):http://www.php.net
- PHP 主页下载:http://www.php.net/downloads.php
- 台湾映射站台:http://ftp.nsysu.edu.tw/Unix/Web/php/
- MySQL:目前最新的版本是 3.23.57(2003/09/10),同样的,你也可以上 MySQL 官方网页去看看喔!
- ./config ( 或 ./configuration ) 创建 Makefile
- make 开始编译
- make install 开始安装到设置的目录去
- 先安装最简单的 MySQL :
- 再安装需要编译的新版 Apache 2.xx :
- 安装 PHP 在您的系统中:
RPM 安装 LAMP 方式:以 Mandrake 9.0 与 Red Hat 9.0 为例
既然要安装 LAMP 自然需要 Linux 系统,以及 Apache, MySQL 及 PHP 啰!我们以 Mandrake 9.0 提供的操作系统,及缺省的相关文件来安装起所需要的套件!需要的套件至少有:
文件可不少哪!所以需要好好的选择来安装才行!『请依照上面的顺序一个一个的安装下去吧!』当然,这么安装会疯掉的呐!所以我们建议使用 urpmi 来安装您的 Mandrake 的 LAMP 主机喔!请回到『网络升级套件』那一章节去查阅如何使用喔!
好了,那么如果是 Red Hat 9 呢?他需要的套件至少也需要底下这些咚咚呐:
当然还有很套件没有列出来咯,您可以使用 apt 去安装这些套件,以克服属性相依的问题呢!重点在 httpd, mysql-serve, php 以及 php-mysql 这几个套件说!挺重要的喔!赶快去安装吧!
鸟哥的特别告知:特别注意到,这里是以 Mandrake 9.0 与 Red Hat 9 做为介绍的,如果您不是以这个版本来安装你的 Linux 系统的话,而且您所在的环境并没有连上 Internet 时,那么在文件的名称上面可能会有一点点的不同!不过不要紧啦!因为你可以使用:
这里不谈完全的安装,我们仅安装可以让 Apache 跑 MySQL 及 PHP 等基本的套件,不玩 LDAP 及其他的咚咚!等到您对于 Apache 有一定的概念之后,自然就可以针对你希望的模块来加以设计了! ^_^其中,最重要的是 mod_php (Mandrake 9.0) 或者是 libphp4.so (Red Hat 9)喔!如果你没有安装下去的话,那么很可能会造成 apache 无法运行 PHP 的困扰喔!OK!这样就安装完毕了!如果你不想要使用 Tarball 安装的话,可以跳到后续的 主机设置 去瞧一瞧设置的步骤啰!
Tarball 安装 LAMP 方式 ( Apache 2.xx 2003/09/10 前 )
Tarball 的安装方式方面,我们选择最新的套件来安装,如果您想要安装旧版的 1.3.xx 的 Apache 时,请参考 LAMP 的安装方法(https://vbird.org.cn/linux_server0360apache-1.php) 一文。
下载各个套件:
要架设这样的一个主机需要哪些套件呢?不就是: Apache、MySQL及 PHP 啰!要从何处下载呢?你可以到中山大学的 FTP 站去搜索,因为他提供的接口鸟哥真是蛮喜欢的,而且也真的很实用喔!寻找文件快又正确!
当然,你也可以到各个套件的发展处去下载:
也就是说,我们需要的文件有三个,分别是:
依序安装:
还记得我们在 Tarball 与 RPM 一文里面提到的 Tarball 的安装方法吗?没错!基本上,就是几个步骤而已:
大致上只有这样而已ㄋㄟ!简单吧!但是 Apache 的安装方法却不太简单! Why ??这是因为他还需要支持 PHP 这个玩意儿!所以就显的特别的麻烦~不过,现在有比较简单的方式了!呵呵!就是使用 Dynamic library 的方式 ( 动态函数库 ) 来安装 PHP ,哈哈!那么就不需要将他 compile 到 apache 里面去,而可以将他视作一个独立的模块!如此一来, PHP 的升级与安装就显的很简单啰!不过,由于动态函数库的安装虽然有好处,然而缺点就是....你的模块路径不能够随便乱摆!好在我们很少将编译好的模块随便移动的~呵呵!所以请注意:底下我们将 PHP 以『动态函数库』的形式来安装。
为什么说 MySQL 最简单呢?这是因为在 官方网站 上面提到了一个问题,也就是使用 source code ( Tarball ) 的方式来编译时,如果您的 compiler ( GCC ) 版本高于 2.96 时,那么您所编译出来的 MySQL 程序,『有可能』会有数据库突然死掉的情况发生!因此, MySQL 的官方网站上面『建议』在目前的版本当中,最好直接以他们编译好的 MySQL 的 binary 版本来进行安装的动作!因为他已经帮你编译好了啊!所以,我们就不需要 make 啰!因此就变的很简单啦!此外,如果你的 Linux 版本中,你的 GCC 大于 2.96 时,且你使用的就是该 Linux 版本提供的 MySQL 时,官方网站上面,亦建议你直接将该 MySQL 移除,然后以他们的版本来安装,会比较没有问题啦!看来我们可能也需要升级一下 MySQL 啦!( 无论如何, MySQL 仅是提出『有网友回报出有这个问题』,所以,如果您的 MySQL 向来就没有问题,那么就不用理会这个困扰了!)
另外,我怎么知道我目前的 GCC 版本呢?可以这样做:
| 1. 查找可以使用:
[root@test root]# rpm -qa | grep gcc libgcc1-3.2-1mdk gcc-cpp-3.2-1mdk gcc-3.2-1mdk gcc-c++-3.2-1mdk 2. 移除 MySQL
可以使用:
|
如果还不会使用 RPM ,那么就不要玩架站吧!说过好多次啰! ^_^!上面的结果就显示我的 gcc 是 3.2 版,哇!太新了!比 2.96 版要更新的多!那么照 MySQL 官方网站的建议,还是置换成旧版本会比较好ㄋㄟ!如果要移除的话,那么就使用 -e 的参数来移除 MySQL 吧!( 注:还是那句老话,请特别留意你的每个动作代表的意义,尤其是如果您的 MySQL 已经运作了一段时间了,请将 /var/lib/mysql 这个目录内的所有数据备份下来! ) 好了!假设我已经将 mysql-3.23.57-pc-linux-i686.tar.gz 这个文件捉下来了,那么要如何安装呢?假设该文件在 /root 底下时:
| 0. 查找是否已经有
mysql 的帐号:
[root@test root]# grep mysql /etc/passwd # 如果没有 mysql 出现的话,那么请创建一个名为 mysql 的帐号! # 这个是要给 MySQL 的 Process 使用的!为了安全性,请务必创建! # 如果之前已经创建过了,那么底下这一步建置的工作就可以跳过, # 直接到 1. 解压缩与创建链接 去安装啰! [root@test root]# groupadd -g 315 mysql # 因为我刚好没有 315 这个 GID ,而 mysql 是系统使用的帐号,我希望他在 500 以内, # 因此就选择 315 做为 mysql 的 gid 啰!你当然可以变更这个数字, # 使用小于 500 的 GID 做为系统的帐号之用只是惯用的习惯而已啦! ^_^ [root@test root]# useradd -u 315 -g mysql -d /usr/local/mysql/data -M mysql # 我使用 315 做为 mysql 这个帐号(与群组同名!)的 UID 啦! # 并且创建他的家目录在 /usr/local/mysql/data 里面! 1. 解压缩与创建链接: [root@test root]# cd /usr/local <==因为已经是 binary 的套件,不用 make ! [root@test local]# tar -zxvf /root/mysql-3.23.57-pc-linux-i686.tar.gz ...(消息略过).... # 最后会产生一个目录: mysql-3.23.57-pc-linux-i686 [root@test local]# ln -s mysql-3.23.57-pc-linux-i686 mysql # 通常习惯将 MySQL 安装在 /usr/local/mysql 当中!但为了未来升级版本的确认, # 官方网站上面建议使用链接的方式来进行 MySQL 的使用! 3. 文件权限修正: [root@test local]# mkdir -p /var/lib/mysql [root@test local]# chown -R mysql:mysql /var/lib/mysql [root@test local]# chown -R root:mysql /usr/local/mysql-3.23* [root@test local]# chown -R mysql:mysql /usr/local/mysql/data # 修改成较为安全,且数据库所属人为 mysql 喔!特别留意啦! 4. 创建数据库: [root@test local]# cd mysql [root@test mysql]# ./scripts/mysql_install_db [root@test mysql]# chown -R mysql:mysql /var/lib/mysql [root@test mysql]# chown -R mysql:mysql /usr/local/mysql/data # 这个步骤会在 /usr/local/mysql/data 里面创建好 MySQL 的数据库! # 由于 /usr/local/mysql/data 是 MySQL 的数据库目录,所以很重要喔!请多加备份! # 不过,在新版的 3.23.57 这个版本当中,数据库竟然移到 /var/lib/mysql 去了! # 还真是有点奇怪呐!另外,根据诸多网友的回报,发现在创建数据库之后, # 还需要重新设置一下数据库的所属群组与拥有者喔! 5. 启动测试: [root@test mysql]# /usr/local/mysql/bin/safe_mysqld --user=mysql & Starting mysqld daemon with databases from /usr/local/mysql/data # 注意:这个时候 mysql 会创建一个 socket file 在 /var/lib/mysql/mysql.sock 喔! # 未来我们在使用 MySQL 的各种指令功能时,都需要使用到这个 socket file, # 但是 MySQL 偏偏缺省的 socket file 是在 /tmp 底下,怎么办?!真讨厌, # 我们可以通过这个简单的动作来欺骗我们的 MySQL 喔! [root@test mysql]# ln -s /var/lib/mysql/mysql.sock /tmp/ # 如果还是找不到 mysql.sock 时,请使用 find / -name mysql.sock # 来找出这个文件的绝对路径吧! [root@test mysql]# netstat -tl | grep mysql tcp 0 0 *:mysql *:* LISTEN [root@test mysql]# ps -aux | grep mysql mysql 6394 0.0 1.5 10528 992 pts/3 S 16:16 0:00 /usr/local/mysql/ mysql 6395 0.0 1.5 10528 992 pts/3 S 16:16 0:00 /usr/local/mysql/ mysql 6396 0.0 1.5 10528 992 pts/3 S 16:16 0:00 /usr/local/mysql/ root 6422 0.0 1.1 2408 732 pts/3 S 16:20 0:00 grep mysql # 呵呵!这样就应该是搞定了! MySQL 已经在监听要求啰!而且所有人为 mysql ! 6. 开机后立即启动! [root@test mysql]# vi /etc/rc.d/rc.local # 将底下这一行加入这个文件的最后面一行喔! cd /usr/local/mysql; /usr/local/mysql/bin/safe_mysqld --user=mysql & # 这样一来,每次开机就可以自动的启动 MySQL 啰! # 注:由于很多网友回复之问题中发现,如果没有加上 cd /usr/local/mysql 时, # 会导致无法自动于开机的时候启动,因此,请大家记得加上这个动作呢! 7. 高端设置内容: # 由于我们 MySQL 放置的地点在 /usr/local/mysql 内,这个目录并不在 PATH 当中! # 且 man page 亦不在 MANPATH 里面,所以,我们要手动的帮他加入啰! [root@test mysql]# vi /etc/profile # 大约在 33 行的地方,而且每个 distribution 设置的地方都不太相同! # 请找到 export PATH ... 那一行,以 Mandrake 9.0 来说,大概在 33 行左右, # 新加入一行: PATH="$PATH":/usr/local/mysql/bin export PATH ....(略).... [root@test mysql]# vi /etc/man.config( 有的 distribution 为 /etc/man.conf ) # 可以在这个文件的任何地方加入底下这一行: MANPATH /usr/local/mysql/man # 就可以具有 man page 的能力了! 8. 创建 MySQL 的 root 帐号密码! [root@test mysql]# /usr/local/mysql/bin/mysqladmin -u root password 'your.password' # 请创建密码!为了安全起见!否则你的 MySQL 数据库,将缺省所有人都可以登录喔! # 注意,如果运行上面的指令时,竟然出现如下的错误: ERROR 2002: Can't connect to local MySQL server through socket '/tmp/mysql.sock' (111) # 这表示 mysql 找不到 mysql.sock 这个文件!我们上面不是提到 mysql.sock 的 # 绝对路径吗?假设是 /var/lib/mysql/mysql.sock 好了,那么我们可以: [root@test mysql]# /usr/local/mysql/bin/mysqladmin -u root \ > -S /var/lib/mysql/mysql.sock password 'your.passwd' # 当然也可以进行文件的链接阿! ln -s /var/lib/mysql/mysql.sock /tmp [root@test mysql]# /usr/local/mysql/bin/mysql -u root -p \ > [-S /var/lib/mysql/mysql.sock] # 后面 [] 的内容不一定需要!且 [] 不要打! Enter password: <==这里输入你刚刚创建的那个密码喔! Welcome to the MySQL monitor. Commands end with ; or \g. Your MySQL connection id is 2 to server version: 3.23.57 Type 'help;' or '\h' for help. Type '\c' to clear the buffer. mysql> exit
# 这样就是可以确认已经可以连接到你的
MySQL 数据库了!请特别留意,有的朋友没有移除
|
有这几个步骤就 OK 啦!您的 MySQL 已经创建了,而且管理者的帐号 root 也已经创建的密码啦!请特别留意的是,这个 root 是 MySQL 的帐号,与 Linux 在 /etc/passwd 里面的 root 是完全没有关系的喔!因为 MySQL 只是 Linux 里面的一个软件,任何 Linux 里面的用户,只要知道 MySQL 的 root 密码,就可以使用 MySQL 的 root 功能! 此外,特别需要留意的还有,由于我们使用的是 Tarball 的方式来安装的 MySQL ,所以我们的 data directory 会是摆在 /usr/local/mysql/data 当中!因此,有必要针对这个目录进行『备份』的工作!(注:还是得视您的 MySQL 版本来设置的!以 3.23.54a 版本来说,他确实是在 /usr/local/mysql/data ,不过 3.23.57 则改换到了 /var/lib/mysql 去了!真是伤脑筋呐!)千万不要大意备份的举动喔!
因为目前有所谓的这个动态函数库,因此,我们在安装 Apache 的时候,请特别要『向 Apache 声明 PHP 模块使用动态函数库的模式』来进行 PHP 的运行!这个时候,你可以这样的来安装你的 Apache 喔!
为什么一定要在 /usr/local/src 底下进行 Tarball 呢?这仅是约定俗成的啦!因为如此一来,大家都安装在这个地方,以后主机的维护与移交都很简易!并且,对于您未来在主机上面的『升级』与『版本判别』都有很好的帮助呢!基本上,如果上面的过程都没有错误发生,那么恭喜您,已经可以顺利的来启动你的 Apache 了!并且应该有第一个主机网页产生啦!呵呵!真是快乐喔!但是如果有问题呢?通常最大的问题排除打字的错误之外,应该就是来自于我们在 Tarball 与 RPM 一文当中提到的,忘记安装那个 make, gcc 等套件!这个时候,请拿出您的光盘,一个一个的将套件安装上去吧!粉麻烦的啦!好了!接着下来看看怎么安装 PHP 咯!而这个方式安装下来的 Apache 首页就在 /usr/local/apache2/htdocs 这里啦![ 注意:在这个安装的方法之后,很奇怪的是,并没有将中文的首页设置正确!你可以到 /usr/local/apache2/htdocs 里头,下达 cp index.html.zh index.html.tw.Big5 即可! ]
没有 PHP 时,您的网页将变的很单调ㄟ~而且粉多的 PHP 论坛都没能架设,很可惜!所以底下我们来谈谈怎么让你的 LAMP 正确的支持 PHP 啰!
| 0. 解压缩:
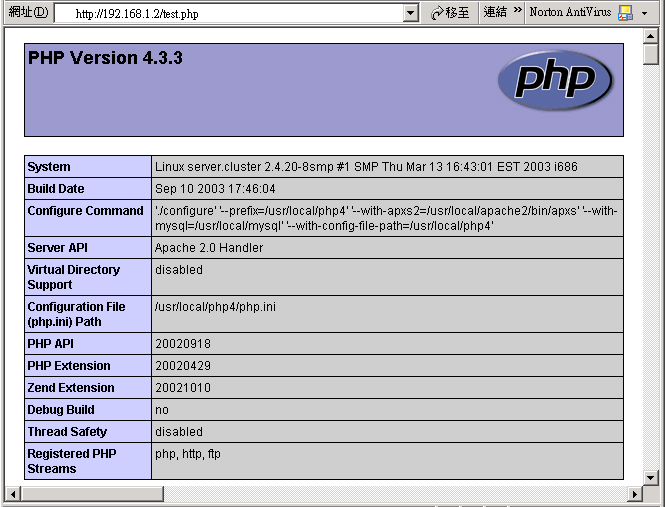
[root@test root]# cd /usr/local/src [root@test src]# tar -zxvf /root/php-4.3.3.tar.gz # .....(消息略).... # 最后会产生一个 /usr/local/src/php-4.3.3 的目录 1. 搜索设置内容: [root@test src]# cd php-4.3.3 [root@test php-4.3.3]# ./configure --prefix=/usr/local/php4 \ >--with-apxs2=/usr/local/apache2/bin/apxs \ >--with-mysql=/usr/local/mysql \ >--with-config-file-path=/usr/local/php4 # 上面请特别注意到: --prefix=/安装的路径:这个项目在设置未来你的 Apache 安装在那个目录当中?! --with-apxs2 :这个则是 Apache2 专用的选项喔!请针对您的主机情况设置! --with-mysql :这个则是针对 MySQL 啦!当然啦,就写我刚刚搞定的咚咚! --with-config-file-path:这个又是什么?呵呵!是 php 的设置档 php.ini 放置的目录啦! # 其他的额外项目请使用 ./configure --help 来察看吧! 2. 开始编译与安装: [root test php-4.3.3]# make; make install # 如果没有错误的话,那么在 /usr/local/php4 这个目录当中就已经将你的 php 安装好了! 3. 转存 PHP 基本组态文件: [root@test php-4.3.3]# cp php.ini-dist /usr/local/php4/php.ini # 这个路径与你刚刚在 ./configure 当中那个 --with-config-file-path 设置有关! 4. 启动 Apache 当中的 PHP 选项: [root@test php-4.3.3]# vi /usr/local/apache2/conf/httpd.conf # 找到底下两行: LoadModule php4_module modules/libphp4.so <==大约在 231 行处 AddType application/x-httpd-php .php <==这一行可以在 847 行处自行增加! 5. 重新启动 Apache : [root@test php-4.3.3]# /usr/local/apache2/bin/apachectl stop [root@test php-4.3.3]# /usr/local/apache2/bin/apachectl start 6. 测试 PHP 是否是正常工作的: [root@test php-4.3.3]# cd /usr/local/apache2/htdocs [root@test htdocs]# vi test.php <?php phpinfo( ); ?> # 以我的测试主机为例,我的测试主机 IP 为 192.168.1.2 ,所以随便以一部可以连接的PC, # 在网址列输入 http://192.168.1.2/test.php # 或者直接在本机的 X-Window 上面输入 https:///test.php 亦可! |
在上面的最后一个步骤中,如果你的浏览器有出现类似底下的画面,那么就是编译成功啦! ^_^,而且,主要的 PHP 组态文件会是在 /usr/local/php4/php.ini 这个文件喔!
哈哈!费了九牛二虎之力,终于将 LAMP 以 Tarball 安装完毕,并且也测试 OK 啰!
升级与安装方式的选择建议:
推荐使用 RPM 的原因:
一般而言,如果没有特别的需求的话,那么使用 RPM 通常已经可以满足大家的需求了!并且在安装上面确实比较容易!此外,未来在升级方面,可以由各家的 Linux distributions 来提供适当的升级版套件,因此,升级上面也是绝对没有问题的!所以这里特别推荐使用 RPM 的方式来进行您的 LAMP 的架设!不但方便简单,而且基础功能都已经含有了!不需要再考虑有的没的咚咚!
有些时候, Tarball 也是不得已的:
不过,有些时候也是不得不升级的呐!或许是因为 distribution 厂商提供的版本速度更新太慢,或者是网络上的 Bug 问题太多,或者是你需要新版本的某些功能时,那么您只好自行以 Tarball 的方式来安装了!而这里需要特别强调的是,如果您使用 Tarball 来安装 LAMP 时,需要整体考量喔!因为 PHP 有使用到 Apache 2.xx 版本的某些功能,所以重新编译 Apache 时,需不需要重新编译 PHP 呢?绝大部分的情况之下,由于 Apache 支持动态函数库,因此或许不需要重新的编译 PHP ,不过,还是需要注意的!并且,使用 Tarball 的时候,最好全部这三个咚咚都使用 Tarball ,不要一个 RPM 一些 Tarball 的,容易错乱啦!
主机设置:
- 终于来到主机设置的地方了!在底下的设置里面,我们讲的是大方向喔!还有很多的设置可能要大家有兴趣的多多自行试看看啰!此外,由于每个版本的
Linux distribution 都会将 Apache 作一些调整,因此,不见得每个 Linux distribution
的设置文件都会在同一个地方!举个例子来说, Red Hat 6.x 版本以前的 Apache
会用到三个设置文件,但是目前新推出的几个 Red Hat 版本中,只要 httpd.conf
这个文件设置 OK 就好了!另外, Mandrake 使用 RPM 安装后, httpd.conf 竟然不是主要设置档!他的
Apache 已经改到 commonhttpd.conf 啰!还真是奇怪~无论如何,如果您使用的是
Tarball 安装 Apache 2.x 的话,那么设置档与套件的目录架构,应该就会差不多了!而且,请善用
locate 与 find 来搜索 Apache 与 PHP 还有 MySQL 的设置档喔!因为他们的设置文件名称应该是不变的!即使
Mandrake 修改了部分内容到 commondhttpd.conf ,但同目录之下,仍然有 httpd.conf
ㄋㄟ!此外,底下我们的设置主要以 Tarball 安装的
Apache 2.xx 版本来谈论。基本上,不论是 1.3.xx 还是 2.xx 版本,主要设置的内容都大同小异啦!看看就能够明了了!
- 主要设置档 httpd.conf :Apache 的主要设置档之文件名为 httpd.conf ,因为不同的安装方式与不同的 Linux distribution 下,这个文件放置的地方会不相同!举例来说, Red Hat 9 的缺省路径在 /etc/httpd/conf/httpd.conf ,而我们以 Tarball 安装之后,该文件则是在 /usr/local/apache2/conf/httpd.conf 啰!请依照您的安装情况来判断这个文件的所在喔!
- 主网页目录:主网页的目录缺省在 /var/www/html 这个目录,而如果是以 Tarball 安装的话,则缺省在 /usr/local/apache2/htdocs 这个目录当中呢!不过,这个主网页的目录是依据 httpd.conf 里面的设置而改变的!
- 注册表:一般来说,注册表我们会希望放置到 /var/log/httpd 里面呢!统一管理比较好一点了!
- 连上 Internet :这不是啰唆的很吗?没错啦!但还是要提醒,既然要对 Internet 公开,第一件事就是要连上 Internet 呐!
- 申请领域名称 ( domain name ):其实应该称为 FQDN 比较好的! ^_^ !如果你使用的连接方式取得的 IP 是非固定的,亦即俗称的浮动式 IP ,那么可以选择类似 www.adsldns.org 之类的免费动态 IP 之 DNS 系统!还颇好用的!详情请参考:申请合法的主机名称一文。那么如果想要自行申请 domain name 的话,那么就可以参考 DNS 的设置啦!但请注意,该服务『最好有固定 IP 』者才适用喔!总而言之,就是当 Client 在找 domain name 就需要可以找到 IP 啦!但要特别留意,如果您希望未来架设虚拟主机的话,那么就务必要有授权的 DNS 啰!
- 安装好 LAMP :又是废话! @_@ 反正一定要好好的安装就是了。这里又要特别强调,除非你有很好的逻辑观念,那么你同时安装 RPM 与 Tarball 还没有关系 ( 同时存在两套 LAMP ) ,反正可以读到正确的即可!但是,如果你没有良好的逻辑概念,那么,如果要安装 RPM ,请将 Tarball 的移除!如果要安装 Tarball ,请将 RPM 移除!当然,数据库与网页的数据请记得备份!这样会比较简单啦,而且不容易发生错误!
- 具备简易的 HTML 语法概念:这个鸟哥就没有办法教大家了!因为不在 Linux 范围内~有兴趣的可以到一个十分棒的网页建置教学网站:网站建置百宝箱(http://dob.tnc.edu.tw/index.php)!因为具备简易的 HTML 观念后,才比较容易理解整个 Apache 运作的数据之传递的状况!
- 基础环境设置:
- 目录路径设置:
- 启动 PHP 与 CGI 相关模块,及缺省的注册表修订!:
LAMP 的套件结构与主机规划
因为 LAMP 主要有三个基本套件,分别是 Apache/MySQL/PHP,那么这三个套件的设置档与主要运行档在哪里呢?
关于 Apache 的路径问题:
我们在浏览网站的时候,总会进入该网站的『首页』吧,那个首页放置的目录就是所谓的『主网页目录』了。主网页目录我们可以在 httpd.conf 里面来设置,不过还是有套件的默认值的啦!底下我们就来谈一谈吧! ^_^
关于 MySQL 的路径问题:
MySQL 是数据库软件呀!所以最重要的当然就是他的数据库放置的目录啰!呵呵!答对了!那么这个数据库放在哪里呢?缺省是在/var/lib/mysql 里面的!所以如果你有使用 MySQL 做为你的网页或者是论坛的话,那么请将这个目录的咚咚备份下来吧!很重要的喔!
关于 PHP 的模块问题:
一般而言,我们大多以『动态函数库』的方式来进行 PHP 的模块编译的!最大的优点就是可以在升级的时候,只要直接升级 PHP 即可!与 Apache 的相关性就比较小一点,因此,在升级某个套件的时候,不需要全部的套件都一起升级的啦!这样真的是比较简单喔!
好了,那么如何规划我们的 Apache 主机呢?如果您的主机想要提供用户来设计个人的首页,那么自然就得开放用户具有家目录啰!而为了安全起见,当然家目录 (/home) 独立一个 partition 是比较好的!并且,由于未来可能会针对不同的用户进行磁盘配额 (quota) 的限制,所以, /home 真的可以考虑独立一个 partition 的啦!此外,如果您的 apache 未来连接的 Client 数量挺大的时候,呵呵!硬盘与内存需要大而且速度快一点的才好喔!
基本要求:
要让您的 Apache 就是 WWW 能够在 Internet 上面被搜索到,您的主机最好要有个 domain name ,亦即是有个独一无二的名字啦!如此一来,在 Internet 上面,大家比较容易找的到您的主机!并且,如果您主机的内容已经大致上完备的话,那么可以到各大搜索引擎去注册(免费)一下,例如奇摩雅虎、蕃薯藤、新浪网等等去注册一下!这样就可以让大家搜索到你的网站啰!所以,你需要:
好了!不啰唆,立刻来实作看看先!
最简易 Apache 设置
为什么挂了个『最简易』呢?呵呵!因为那就是没有任何麻烦的设置嘛!基本上,如果你按照鸟哥上面 Tarball 的方法安装好之后,其实立刻就有主机的首页了!当然,使用 RPM 也有首页啦!因此,用最原始的设置其实就可以进行主机的首页浏览了!需要特别注意的是,第一次进入到 Apache 之后,你会发现有个 documentation ,在那个超链接当中,对于 Apache 有『相当完整的介绍!』如果有任何问题,可以到该链接里面去搜索!绝对可以找到您要的信息喔!底下我们就以 Apache 2.xx 版本的设置文件来介绍,如果您是 1.3.xx 版本,请自行参考底下的设置来解决您的 httpd.conf !设置方面差不多啦! ^_^
此外,需要注意的是基本的环境设置方法为:
- <设置项目>
......
......
</设置项目>
例如:
- <Directory>
Options Indexs
</Directory>
几乎都是这样的设置方式喔!请注意一下即可!特别留意的是,如果你有额外的设置时,不能随便在 httpd.conf 里头找地方写入!否则如果刚好写在 <Directory>...</Directory> 里面,呼呼!那么就会发生错误啦!需要前前后后的找一找喔!
| [root@test
root]# cd /usr/local/apache2/conf
[root@test root]# vi httpd.conf ServerRoot "/usr/local/apache2"
PidFile logs/httpd.pid
Timeout 300
KeepAlive On
MaxKeepAliveRequests
100
KeepAliveTimeout
15
<IfModule
prefork.c>
Listen 80
User nobody
ServerAdmin
root@localhost
#ServerName
new.host.name:80
UseCanonicalName
Off
AddDefaultCharset
ISO-8859-1
HostnameLookups
Off
|
| [root@test
root]# cd /usr/local/apache2/conf
[root@test root]# vi httpd.conf DocumentRoot
"/usr/local/apache2/htdocs"
<Directory
/>
<Directory
"/usr/local/apache2/htdocs">
UserDir public_html
DirectoryIndex
index.html index.html.var
Alias /icons/
"/usr/local/apache2/icons/"
Alias /manual
"/usr/local/apache2/manual"
ScriptAlias
/cgi-bin/ "/usr/local/apache2/cgi-bin/"
|
| [root@test
root]# cd /usr/local/apache2/conf
[root@test root]# vi httpd.conf LoadModule php4_module
modules/libphp4.so
ErrorLog logs/error_log
|
启动 httpd (如何关闭 https )
要启动 WWW 实在是太简单啦!直接给他启动即可!如果是以 RPM 安装的,那么启动文件缺省在 /etc/rc.d/init.d/httpd 这个文件,所以,你可以这样启动:
| [root@test
root]# /etc/rc.d/init.d/httpd start
(启动)
[root@test root]# /etc/rc.d/init.d/httpd stop (关闭) |
至于 Tarball 则是以 apachectl 来作的:
| [root@test
root]# /usr/local/apache2/bin/apachectl start
(启动)
[root@test root]# /usr/local/apache2/bin/apachectl stop (关闭) |
无论如何,启动之后请立即察看一下 port 是否已经打开了?!
| [root@test
root]# netstat -tuln | grep ':80'
tcp 0 0 0.0.0.0:80 0.0.0.0:* LISTEN |
并且需要在注册表当中发现底下这一行才算成功喔!
| [root@test
root]# vi /var/log/httpd/error_log
[Thu Dec 26 20:16:53 2002] [notice] Apache/2.0.43 (Unix) PHP/4.2.3 configured -- resuming normal operations |
如何关闭 https :
此外,如果您比较细心留意的话,会发现 Red Hat 9 的 httpd.conf 里面有这一行:『Include conf.d/*.conf』(大约在 162 行的地方),这表示:『 Apache 在启动的时候,除了读取原来的 httpd.conf 这个设置档之外,也会读取 /etc/httpd/conf.d/*.conf 的所有文件来规范 Apache 的启动状态。』这样的设置无疑是比较灵活的,可惜的是,对于一些初接触 Apache 的朋友来说,可能会觉得有点怕怕的~ 好了,那么我们来看一下, Red Hat 9 里面的 /etc/httpd/conf.d/ 有什么数据呢?
| [root@test
root]# ll /etc/httpd/conf.d/*.conf
-rw-r--r-- 1 root root 814 Feb 10 2003 /etc/httpd/conf.d/perl.conf -rw-r--r-- 1 root root 459 Jun 30 04:35 /etc/httpd/conf.d/php.conf -rw-r--r-- 1 root root 1276 Feb 20 2003 /etc/httpd/conf.d/python.conf -rw-r--r-- 1 root root 11140 Jul 31 23:40 /etc/httpd/conf.d/ssl.conf |
在上面的文件当中,较为有趣的是 ssl.conf 那个文件,那个咚咚就是我们前面提到的以 SSL 加密的设置值!这个设置值会让我们的系统多了一个 https (port 443) 在监听网络服务呢!有需要这东西吗?当然不需要了!因为我们又不需要使用信用卡数据说~好了,那么如何将 Red Hat 9 的 https 取消呢?呵呵!将 ssl.conf 更改文件名即可!不要使用 .conf 的附文件名就行了!例如底下的方式:
| [root@test
root]# cd /etc/httpd/conf.d
[root@test conf.d]# mv ssl.conf ssl.conf.bak [root@test conf.d]# /etc/rc.d/init.d/httpd restart |
这样就可以关闭 https 啰!
测试结果:
- 相信您应该都会自行测试您的 WWW 是否正常了吧?!没错! Apache 是否正常,直接在远程的主机,或者是近端的本机上面,以浏览器直接输入你的
IP 来试看看即可知道!而测试 PHP 呢?就用上面我们提到的那支小小的 PHP 程序来进行
PHP 的内容显示,成功就是 OK 啦! MySQL 呢?直接给他 mysql -u username -p
再输入密码,就可以知道有没有设置成功啦!整个的设置真的是粉简单的啦!通常,如果上面的测试没有成功的话,最大的可能为:
- 网络问题:虽然在本机上没有问题,但不代表网络一定是通的!请确认一下网络状态!例如 Route table, 拨接情况等等;
- 网页问题:例如鸟哥第一次以 Tarball 安装好之后,竟然发现无法显示主机的首页!后来才发现是主机的首页设置错误!导致找不到网页,这个时候,请特别留意浏览器上面的显示消息,里面包含了无法连进来主机的问题!请提供这样的消息到讨论区,大家才知道问题出在哪里呐!
- 权限问题:例如你刚刚在上面的 user 设置为 nobody 了,但偏偏要被浏览的目录权限为 750 ,自然就无法让人家连接进去啦!
- 问题的解决之道:如果还是没有办法连接上来你的 Linux Apache 主机,那么请:
- 察看 /var/log/httpd/error_log 这个文件吧!他应该可以告诉你很多的信息喔!
- 另外,也要仔细的察看一下你的浏览器上面显示的信息,这样才能够知道问题出在哪里! ^_^
- 另一个可能则是防火墙啦!察看一下 iptables 的消息!
用户的个人网页启动
呵呵!再来则是个人用户啦!如果是个人用户要自己的首页时,要怎么办呢?刚刚我们不是提到了 httpd.conf 中有一项关于个人首页的设置,通常如果你不另行修改 httpd.conf 文件的话,他的默认值都是『 public_html 』这个设置,好了,那要如何设置个人网页呢?假设以 test 这个帐号为例,我们可以这样进行:
| [test@test
test]$ cd
# 回到自己的家目录
[test@test test]$ mkdir public_html [test@test test]$ chmod 755 public_html [test@test test]$ chmod 755 /home/test # 在你的用户端家目录中创建了一个 public_html 的目录, # 并将此目录的权限改成可以让其他人观看,注意喔, apache # 缺省是 public_html ,但是如果你在 httpd.conf 这个文件中 # 改变了目录名称,则必须作适当的修正喔! |
然后在你的目录中,亦即 /home/test/public_html 当中,创建一个文件名为 index.html 的 HTML 文件,然后在 IE 的网址列打入
- http://你的网站名称/~test/
- 则 apache 会自动将 IE 的消息传到 /home/test/public_html 这个目录中,并搜索文件名为
index.html 或 index.htm 或 index.php 的文件名!所以说, index.html 是 apache
第一个找寻的文件名喔!这就是你的首页啦!
- 不过,如果您觉得这样实在很讨厌,怎么需要多加一个毛毛虫的符号『 ~ 』呢!真烦,可不可以只使用:
- http://你的网站名称/test
- 就好啦!?当然没问题啦!但是就需要动一点手脚了!最常见的有两种方式:
- 创建链接档:
- 创建 Alias:
- 在 Alias 后面双引号接的目录『务必』于最后面加上一个 / ,亦即 ....public_html/ 才行!若没有加上 / ,则该行字符串会被视为『文件』而非目录!特别留意这一点!
- 那个 <Directory ....> 里面的设置中,关于目录 /home/test/public_html 请『务必』帮他加上双引号喔!否则可能会无法成功的启动!!
这是最简单的方法啦,还记得我们的主页有 Options FollowSymLinks 吧?!呵呵!所以利用 ln 就可以达到我们的需求了!首先,需要找到首页,然后在首页底下输入链接的方法:
| [root@test
root]# cd /usr/local/apache2/htdocs
[root@test htdocs]# ln -s /home/test/public_html test |
另一种方是就是使用我们刚刚提到的那个 Alias 功能啦!也是粉简单的ㄋㄟ:
| [root@test
root]# vi /usr/local/apache2/conf/httpd.conf
Alias /test/ "/home/test/public_html/" <Directory "/home/test/public_html"> Options FollowSymLinks AllowOverride None Order allow,deny Allow from all </Directory> [root@test root]#
/usr/local/apache2/bin/apachectl
stop
|
好啦!这样你的用户之个人网页就 OK 啰! ^_^
高端安全设置:
- 接着下来,我们想要了解一下,那么 Apache 有没有其他额外的设置呢?
- 使用 Options 及 ExecCGI
- 使用 ScriptAlias 功能:
CGI 之运行、Index 显示、查无网页显示之设置:
CGI 之运行:
首先要来提到的是 CGI 的运行问题,这也是很多朋友想要提出的问题啦!到底要怎么设置才可以在某些路径里面运行 CGI 的程序呢?而不是使用纯文本将他 show 出来?!难道要运行 CGI 就非得在 /usr/local/apache2/cgi-bin 这个目录下不可吗?当然不是!有很多的方法可以来设置的!举个例子来说,假设今天有个一般身份的用户 test ,他想要可以运行 CGI ,那么他的家目录在 /home/test/public_html 底下,而他的程序是放在 /home/test/public_html/cgi 这个目录中,那我可以怎么作呢?同样有两种作法:
你可以在 httpd.conf 这个文件中,找个地方加入底下的文本:
| [root@test
root]# vi /usr/local/apache2/conf/httpd.conf
方法一:
# 再加入底下几行:
方法二:
[root@test root]#
/usr/local/apache2/bin/apachectl
stop
|
还有另外一个功能也可以达到同样的效果,那就是使用 ScriptAlias 喔!你可以在 httpd.conf 这个文件中,找个地方加入底下的文本:
| [root@test
root]# vi /usr/local/apache2/conf/httpd.conf
# 先确认在 httpd.conf
当中,底下这一行已经将注解拿掉了!
# 再加入底下这一行:
[root@test root]#
/usr/local/apache2/bin/apachectl
stop
|
刚刚我们前面不是提到 Options 关于 Indexes 的说明吗?对啦!由于 Indexes 加入的时候,找不到 index.html 时,会将该目录下的所有文件以类似 FTP 的画面秀出来,所以很危险,因此,可以的话,尽量不要在 Options 后面加 Indexes 喔!记得将他拿掉!会比较稍微安全一些!
- 查无网页:
- 设置 httpd.conf
- 编辑 /usr/local/apache2/htdocs/missing.html
- 抵挡某些 IP 或 domain 来源:
- 限制某些功能:
- 既然我们是『按了某个链接进入某个目录之后,才会出现对话窗口』,那么首先当然就是要有那个设置为认证网页的『目录』啰!请注意,是要目录才行喔!
- 然后,在对会窗口中,既然我们需要输入 ID 与密码,那么自然就需要密码档啰!另外,虽然 Apache 有支持 LDAP 及 MySQL 等等的认证机制,不过我们这里并不讨论其他的认证机制,完全使用 Apache 的缺省功能而已,所以,底下我们会使用基本 ( Basic ) 的认证模式喔!
- 再来,当然就是到 httpd.conf 文件中去设置我们刚刚创建的那个目录的相关信息啰!
- 最后,重新启动就 OK 啦!
- 制作保护目录:
- 最简单的方是就是直接在 /usr/local/apache2/htdocs 这个目录下再创建一个名为 protect 的子目录啰!不过,这样似乎太简单了 ^_^
- 再来,如果您的网页支持 FollowSymLinks 这个参数(options)的话,那么在任何一个目录下,只要你在 /usr/local/apache2/htdocs 利用 link ( ln ) 制作一个链接档,那么也可以达成所要的目的!
- 最后,哈哈!直接使用 Alias 就可以啦!
- 制作密码档:
- 针对保护的目录设置认证的内容:
- 重新启动与测试:
- 修改 httpd.conf这个文件;
- 然后再重新开机,好让设置的结果可以正确的显现出来!
- 我就要把 root 的密码给他们吗?好让他们可以自行修改 httpd.conf ?如此一来的话,不就粉危险,而且,难保 A 君的设置被 B 君不小心给修改了~哇!真是伤脑筋~
- 我就要一个一个的帮他们修改吗?谁来就要帮谁改,难道改天我有 200 的用户时,若一天分配给一个人,我就要改 200 天的 Apache ,岂不讨厌~
- Options:就是允许自行设置一些网页参数,例如 Index, ExecCGI....等等
- AuthConfig:就是网页认证的设置内容啦!
- Limit:就是上面我们提到过的关于安全的设置咯!
- All:上面的规定都可以允许 .htaccess 里面来设置
- None:上面的规定都不许由 .htaccess 来规定!
那么好啦,既然不要秀出没有 Index.html 的目录下的所有文件,有没有什么替代的方法,可以让用户知道该目录下没有这个文件,并提供他另一个网页的链接呢?再举个另外的例子,如果你的网页经过了大量的改版,所以某些原来的文件已经不见了!但是你有很多的老网友,那么他们连过来的时候,将会发生很多的错误,怎么办?
没关系,还记得当你查不到网页的时候, IE 或者是其他的搜索引擎,会自动的跑出一个窗口,警告说,查无该网页,并提供另一个可能的链接给您是吧?!同样的,我们也可以利用这样的机制,自己创建一个额外的链接数据来给大家使用!如此一来,嘿嘿!找不到网页也没关系,我们已经提供了其他的链接,这样就可以很轻易的引导用户到适当的目录去浏览啦
又要设置这个 httpd.conf 文件啦!找到底下的地方,并且将他打开吧:
| [root@test
root]# vi /usr/local/apache2/conf/httpd.conf
# 大概在 880
行左右,可以找到下面这一行:
[root@test root]#
/usr/local/apache2/bin/apachectl
stop
|
再来则是要编辑这个文件啰!因为只要没有找到对应的网页时,这个网页就会被显示在 Client 端的浏览器上面,喝!你可以这样编啦:
| [root@test
root]# vi /usr/local/apache2/htdocs/missing.html
<html> <center> Missing HTML Web Page<br><br> I can't find any web page for you, <br> Please contact with me root@localhost, <br> or press <a href="http://192.168.1.2/manual/">here</a> to see the manual of Apache 2.xx </center> </html> |
抵挡 IP 与限制用户动作的设置(allow, deny, limit)
任何的 Service 都一样,应该都会有『限制连接登录者』的功能!当然, Apache 也不例外!他提供了抵挡 IP 或者是限制用户进行某些工作的方法!那就是 Allow 与 Deny 的功能,另外,亦有 Limit 的功能可以来使用!
很多时候我们发现有某些来源的用户似乎没有很遵守我们网站的约定,可能会砍站啦,或者是可能从事一些让管理员很生气的勾当!当然,你可以使用 iptables 等之类的防火墙功能来挡掉他,不过,我们也可以额外的再以 Apache 来挡他喔!还记得我们在前面的 <Directory> 里面的设置时,常常会看到 order allow,deny 那一行吧!呵呵!那就是我们可以针对的某些设置啦!举例来说,假如你知道 192.168.1.100 这个 IP 的用户不乖以及 testing.idv.tw 这个 domain 的来源不被信任,你就不让他进入某个目录内,例如 /home/test/public_html/cgi,那么你可以这样做:
| [root @test
root]# vi /usr/local/apache2/conf/httpd.conf
# 额外再添加几行吧! <Directory "/home/test/public_html/cgi"> Options ExecCGI SetHandler cgi-script order allow,deny deny from 192.168.1.100 deny from testing.idv.tw </Directory> |
一般来说, Client 端有哪些功能可以动作呢?大概有:GET, POST, OPTIONS, DELETE 等等,由于 POST 与 DELETE 算是比较高权限的功能,如果今天您有一个目录,在这个目录中对于 192.168.1.50 这个 IP 来源你只许他观看,而不许他粘贴数据,那么你要怎样设置呢?我们继续以上面的例子来进行说明好了,在 /home/test/public_html/cgi 这个目录中,你要限制让 192.168.100.0/24 这个网段不能『浏览』,至于张贴文章方面,则仅有 192.168.1.50 这个 IP 可以具有这样的的功能,那么你可以这样修改:
| [root@test
root]# vi /usr/local/apache2/conf/httpd.conf
# 额外再添加几行吧! <Directory "/home/test/public_html/cgi"> Options ExecCGI SetHandler cgi-script <Limit GET> order allow,deny deny from 192.168.100 allow from all </Limit> <Limit POST> order allow,deny allow from 192.168.1.50 deny from all </Limit> order allow,deny deny from 192.168.1.100 allow from all </Directory> |
主机状态说明网页设置
既然已经安装好了 WWW 主机,除了提供服务之外,重要的是要如何维护啰!嘿嘿!那么是否一定要额外安装其他的套件才能知道目前的主机状态呢?当然不需要啦!我们可以通过 Apache 提供的特别功能来查找主机目前的状态!那就是 mod_status 这个模块啰!如何使用呢?由于 mod_status 是缺省一定会安装的模块,所以根本不需要担心加载与否的问题,唯一要担心的,则是需要启动这个模块的相关设置而已!同样的,也是编辑 httpd.conf 这个文件即可,可以这样做:
| [root@test
root]# vi /usr/local/apache2/conf/httpd.conf
# 找到底下这几行,并且将他修改一下: <Location /server-status> SetHandler server-status Order deny,allow Deny from all Allow from 192.168.1.11 </Location> [root@test root]#
/usr/local/apache2/bin/apachectl
stop
|
在上面的设置中,必须要特别留意那个 Deny 与 Allow 的设置,说明的是,要察看这个消息的,只有 192.168.1.11 这个 IP 来的要求才提供!否则一切则予以禁止。当然啦,主机的安全是需要维护与保密的,当然不让人家知道是比较好的呢!然后直接在网址上面输入: http://your.server.name/server-status 这样就可以看到你的主机的一些状态啰!有点像底下的样子:
| Apache Server Status for 192.168.1.2
Server Version: Apache/2.0.43 (Unix) PHP/4.2.3 Server Built: Dec 26 2002 01:59:03 ------------------------------------------------------------------------------ Current Time: Monday, 30-Dec-2002 01:31:28 CST
Scoreboard Key:
PID Key:
31027 in state: W , 31028
in state: _ , 31029 in state: _
------------------------------------------------------------------------------
Apache/2.0.43 Server at 192.168.1.2 Port 80 |
上面说明的,除了显示出主机目前的 IP 与 时间 之外,亦列出 Linux Server 上面,关于 Apache 的使用进程状态!虽然很简单且阳春,不过该有的还都是有了!蛮不错的ㄋㄟ~有空的时候,可以多多的察看一下 Apache 的状态!不过,特别需要注意一下能够使用这个路径的,最好局限在少数人会较为安全喔!
关于权限的意义说明与设置
在网络的服务当中,最麻烦的地方可以说是『权限』的问题了!怎么说呢?刚刚上面提到了提到了 httpd.conf 当中有设置 User 与 Group 这几个咚咚,而这两个属性是针对 Process 来设置的,也就是说,当你启动了 apache 之后,就会有 httpd 这个服务的 Process 在你的 Linux 系统(内存当中)的背景中运行了,而且这个 httpd 属于刚刚我们设置的 nobody 用户与 nobody 群组(注:刚好 User 与 Group 的名称都叫做 nobody 啦!^_^)!所以啰,当使用 httpd 这个 Process 来进行 Linux 数据的访问时,那么如何设置 Linux 底下最重要的『权限』问题呢?还记得我们在 Linux 主机之资源管理 里面提到的,所谓的 PID 就是 Process 的 ID,当我们触发一个事件时,Linux 就会给这个事件一个 ID 当作运行时候的识别码,例如当 test 这个人下达『 vi /etc/fstab 』的时候,主机就会给这个事件一个 ID ,此外,这个 PID 还会记录其他的权限喔!例如,因为启动 vi 这个事件的用户是 test ,所以这个 PID 当然就属于 test 啰!所以当 vi 运行期间所打开的所有文件,都需要针对 test 来察看他是否可以具有读、写、运行的权限呢!
这样说您应该有点了解了吧?是的,你在 Client 是否能浏览 Server 所提供的数据,是跟 Server 内的『权限』设置有关呐!举个例子来说,还记得刚刚我们有将 /home/test/public_html 这个目录设置成可浏览吧!而这个目录属于谁呢?没有错,是属于 test 这个人的!那么我们的 apache 所启动的 process 属于谁呢?以上面的例子为例,那就是 nobody 这个人的!那么万一 /home/test 的属性是『drwx------』,请问你,Client 端的用户能否浏览这个目录呢?呵呵!由于 Apache 的 nobody 在 /home/test 的权限当中要寻找的是 others 的属性,嗄!怎么是『 --- 』,自然就是『不行浏览!』无论你的 /home/test/public_html 权限开放的有多大!这样可以了解吗?也就是说,万一上层目录就不许进入了,那么底下的目录当然也就无法被登录啰!
一般而言,用户容易在个人首页发现『Permission deny』的字眼,最常见的问题就是『Linux 权限设置错误』了!只要针对你的权限去修订,那么差不多就可以解决绝大部分的 Apache 权限问题喔!另外,需要特别留意的是,用户能否进入一个目录,主要是与可运行与否的权限(也就是 x )有关,因此,如果您要开放静态网页的浏览,那么至少应该要将 /home/test 设置成 drwxr-xr-x ,亦即是 755 才行,不过,如果您要运行的是 PHP 之类的网页编程语言,呵呵!那么您只要设置 drwx--x--x 就可以啰!也就是 711 啦!因为毕竟 Client 只要能够运行 PHP 程序即可,因为结果的显示是在 Client 端呐!与是否能在 Server 端浏览是没有关系的ㄋㄟ~
设置认证网页
是不是有过进入某个网站之后,按下某些链接,竟然出现一个对话框框,告诉你要登录该目录,需要输入帐号与密码才能登录?呵呵!那就是所谓的『认证网页』啰!这种认证的模式最起码可以达到最小的保护作用,使你的数据比较保险啦!咦!那么使用 Limit 不就好了?但是 Limit 的规定较为严格,若是改天你去外头的网吧店,然后想要连接进入你的主机作一些事情,如果你设置除了内部 IP 之外,外部就无法以 Web 接口连进来的话,那么不就糗了吗?呵呵!这个时候认证网页可就是你的好帮手啰!另外,目前很多学校老师也会将自己的讲义放在网站上,然后以认证网页的方式提供自己的学生下载使用!所以说,这个也是蛮不错的一个变通方式哩!
那么认证网页怎么搞呀!?说来还真的是很容易ㄋㄟ!
好了,那么我们来作个例子吧!假设,我要在 https:///protect/ 这个目录下作一个认证数据,在这个目录当中仅有 test.html 这个文件,此外,我要让 test 这个 ID ,密码为 testing 及 qqq 这个帐号,密码为 qqqpass 做为登录的帐号,那么我该如何设置我的数据呢?一样的,一步一步来进行吧!
第一步骤当然是制作保护目录啰!既然这个目录在 https:///protect/ 底下,那么有哪些方式可以达成呢?
| [root@test
root]# mkdir -p /usr/local/apache2/htdocs/protect
[root@test root]# cd /usr/local/apache2/htdocs/protect [root@test root]# echo "This is a protect page" > test.html |
制作密码档只要使用 htpasswd 这个命令就可以啦!他的语法是这样的:
| htpasswd
语法: [root@test root]# htpasswd [-c] password_file_name User_name 说明: -c :当后面的 password_file_name 这个密码档不存在时,那么就创建该文件 范例一:
范例二:
[root@test apache2]#
more
apache.passwd
|
当然接下来我们要针对那个受保护的目录进行设置啦!就是要又开始搞设置档啰!怎么搞?!就是要加入信息呐!加入哪些信息呢?这当中当然就包含了『密码档的完整目录与文件名、认证的类型、提示的字符、与允许登录的用户』如果你看到认证网页的登录窗口时,通常就会看到两个输入 ID 与密码的格子,所以自然要设置密码档的文件,而你也会看到该窗口上面有一些提示字符告诉你这个网页是干嘛用的!另外,像我们刚刚制作了两个帐号,那万一你只允许一个帐号登录,另一个帐号不许登录,那要如何搞呢?可以这样搞喔:
| [root@test
root]# vi /usr/local/apache2/conf/httpd.conf
在这个文件的设置中,请特别留意设置的地方,不要设置错误地方, 一般而言,新的咚咚可以加在最后面一行开始,比较不会搞错地方! 加入底下这几行: <Directory "/usr/local/apache2/htdocs/protect"> AuthName "Protected Directory" #这个是显示在窗口上面的提示字符 AuthType Basic #这个则是认证的类型!就选Basic即可,Apache的缺省功能 AuthUserFile /usr/local/apache2/apache.passwd #密码档放置的地方啦!完整的目录与文件名 require valid-user #允许的用户,valid-user为任何一个在认证文件当中的帐号皆可 #require user test #若将 # 移除,则表示只有 test 才是可以登录的帐号! </Directory> |
这个不用再讲了吧?!:
| [root@test
root]# /usr/local/apache2/bin/apachectl stop
[root@test root]# /usr/local/apache2/bin/apachectl start |
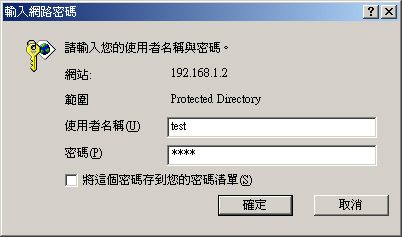
看到那个 Protected Directory 的字眼了吧!那就是 AuthName 啰!然后用户名与密码即是我们刚刚创建的密码档之内容啦!认证网页设置成功!恭喜喔!
.htaccess 文件与 AllowOverride 设置的用途:
从头到现在有的学的吧? ^_^ 粉累喔!呵呵!尤其最累的是,如果万一你真的设置好了一个 Apache ,而且也真的很高兴的对外开放了!那么你是否会注意到一件事情,那就是,万一你有 20 的用户,每个用户都要求由他设置自己风格的家目录,亦即他们想要自己设置自己的认证网页,想要自行管理自己的 Apache 底下的其他功能,怎么办?由于有关 Apache 的设置就一定需要:
如此一来的话,难道:
这不是很累吗?呵呵!这个时候, .htaccess 的文件就『英雄有用武之地』咯!这个文件的最大功能就是『可以取代 httpd.conf 里面,对于这个 .htacces 所在目录的设置内容!』也就是说,如此一来,每个目录下的 .htaccess 可以让该目录拥有相关的权限、风格等等的设置!如此一来, root 也就不会这么累了,并且,修改完这个文件之后,也不需要重新开机ㄋㄟ!棒吧! ^_^,不过,到底 .htaccess 这个文件可以工作的内容有哪些呢?呵呵!这个时候,可就需要 AllowOverride 在 httpd.conf 里面的设置来规定啰!所谓的 AllowOverride 说的是『允许取代某些设置内容』的意思,而这个 AllowOverride 可以取代的数据有:
如果你想让 .htaccess 这个文件有最大的取代内容时,可以选择 AllowOverride All,若仅想让这个文件具有取代网页认证的功能,那么就可以使用 AllowOverride AuthConfig 即可!
举个例子来说,刚刚我们设置 /usr/local/apache2/htdocs/protect 为保护目录,需要做的事情最重要的为设置 httpd.conf 这个文件,并且需要设置有的没的一大堆,好了,现在假如我想让所有的 user 都能自行在自己的家目录内进行?怎么利用 .htaccess 这个风格文件呢?这其中当然涉及了(1)root 对于 httpd.conf 的设置以及(2)一般身份用户对于自己家目录下的设置!好了,现在我们分别以两种身份来设置自己家目录下的咚咚,以 test 这个用户为例好了,来看看怎么使用认证网页在一般用户家目录下!
| 关于
root 的设置项目:
0. 先确认底下这些信息可以在您的
httpd.conf 里面发现:
1. 创建让每个用户家目录下都能自行设置
AuthConfig 的规则!
关于 一般身份用户 (test 为例) 的设置项目: 0. 以一般身份用户登录,或者使用
su 转换 test 的身份
1. 创建保护目录与网页内容
2. 创建 test
自己的密码档
3. 创建 .htaccess
文件的内容!
|
赶快去测试看看吧!这样对于 Root 来说,是比较轻松一点,对于用户来说,可以使用的规范也比较多样化!但是,衍生出来的安全问题,可能就需要大家共同的维护了!当然啦,你也可以使用 AllowOverride 来设置更多 .htaccess 可以规范的项目呢!
防火墙
一句老话啦!就是『如果你的 Server 不能动,但是确定设置都没有问题,那么除了持续查找 log file 之外,最大的可能就是防火墙挡住了!』这句话应该没有什么太大的疑问才对~所以呢,万一你的 Apache 不能动,那么请看看你的防火墙设置规则吧!因为防火墙我们已经提过了,请参考『简易防火墙设置』一文,这里不再赘述!
注册表分析与其重要性
- 无论怎么说,注册表永远是相当重要的!尤其是在 /var/log/httpd 里面的
error_log 这个文件!因为:
- 他记录了所有试图进入你主机读取 apache 的网页数据,但是却失败的所有纪录,
- 此外,如果你的 Apache 设置错误,那么问题也是记录在这个文件中;
- /var/log/httpd/access_log
- /var/log/httpd/error_log
- /var/log/httpd/pid
- 官方网站:http://www.mrunix.net/webalizer/
- 设置难度:简单,极适合新手架设
- 软件特色:大致上,所有分析的内容他都有了!虽然图表比较没有那么炫...
- 授权模式:GPL
- 我的 Apache 注册表案为 /var/log/httpd/access_log 这个文件!
- 预计直接将软件安装在 /usr/local 底下(Webalizer 提供了反安装!)
- 预计将输出的内容传导到 /usr/local/apache2/htdocs/webalizer
- 官方网站:http://awstats.sourceforge.net/
- 设置难度:较难,需要有点技巧!
- 软件特色:中文化的很完整,而且该有的都有了,相当炫的一个分析利器!
- 授权模式:GPL
而至于其他相关的文件,嘿嘿!那个 /var/log/httpd/access_log 文件也需要注意一下,因为他记录了所有来自 Client 端的 IP 以及其他相关的读取数据之消息!这个文件对于未来分析你的 Apache ( WWW )被读取网页的所有纪录喔!相当的重要的啦!
syslog 与 logrotate:
首先针对 Apache 的设置档当中,要注意的就是那个 syslog 与 logrotate 啰!详细的信息可以参考一下『鸟哥的 Linux 私房菜 -- 基础学习篇』之认识注册表。好了,那么你的 syslog 应该要怎么设置呢?因为我们毕竟是使用 tarball 安装的,所以根本就没有所谓的 syslog 的设置,不过,这个不需要担心,这是因为 Apache 里面本来就有 syslog 的设置存在了!所以,这点我们不需要重新来设置啦!只要记得你的注册表目录是在哪里就可以啦!目前我的注册表与 pid file 是在:
然后,我的 logrotate 的纪录目录在 /etc/logrotate.d 里面,因此,我就在里面添加一个文件,称做是 apache,你可以这样做:
| [root@test
root]# cd /etc/logrotate.d
[root@test logrotate.d]# vi apache # 新加入这几行 /var/log/httpd/access_log /var/log/httpd/error_log { rotate 4 missingok sharedscripts postrotate /bin/kill -HUP `cat /var/log/httpd/httpd.pid 2>/dev/null` 2> /dev/null || true endscript compress } |
如果不知道上面的每个数据代表的意义,还是请前往 认识注册表 一文喔!然后赶快试看看是否可以运行 logrotate 呢?
logrotate -f /etc/logrotagte.conf呵呵!这样就对啦!那么为什么要加入这个 logrotate 呢?这是因为,未来,如果你的 WWW 服务器越来越大时,那么应该 access_log 文件会『很可怕的大!』例如目前本小站的流量每周可以造成我的注册表长大到 400MB 以上~如果不将他 rotate 的话,哈哈!不出几个星期,我的硬盘就爆了~所以, logrotate 是很重要的喔!
Web Analyser
如果我想要知道最近有谁曾经来我的网页上面逛过,以及该用户使用的是什么样的操作系统呢?该怎么看?!很简单呐!直接跑到 /var/log/httpd/access_log 这个文件里头去瞧一瞧就知道啦!里面的纪录有点像这样:
| 192.168.1.11
- - [27/Dec/2002:00:20:24 +0800] "GET /manual/ HTTP/1.1" 200 7340
来源 IP 日期与时间 动作与网页 动作代码 |
立刻可以知道在何时,那个 IP 对于本机的动作是什么,以及是否有成功?很清楚对吧!所以我们可以借由这个文件知道我们的主机被利用的状态!但是,如果像我的主机一样,一下子就有 400 多 MB 的文件,您要怎么分析?看都看不完ㄋㄟ~呵呵这个时候,就需要使用 Shell scripts 的帮助啦!你可以自行写一个适合您自己的分析工作,来进行解析的行为!不过,由于目前网络上已经有很多的好用的 Web 分析的工具啦!所以呢,我们只要进行他的安装即可喔!很方便吧!底下我们介绍几个好用的 Web 分析工具来给大家瞧一瞧!
Webalizer 网页分析工具
这个是很不错,也且功能也都很完备的一个网页分析软件!不论是在安装与设置上面,都是粉简单的ㄋㄟ~所以才说他是极适合新手来安装的一个软件呐!此外,由于他是 GPL 授权码的软件,所以呢,嘿嘿!很快乐的下载吧!请赶快到官方网站下载一下啰!
整个安装流程上面很简单,最重要的地方只有在设置的一些小步骤需要留意而已,好了,废话不多说,我们直接来安装与测试一下,就知道他是怎么回事啦!不过,在安装与设置之前,你必须要先知道你系统里面的 log file 在哪里,以及未来要安装在何处?!我的规划是这样的:
好了,开始来下载、安装与设置吧!你可以依照底下的网站来下载,不过不保证该文件会继续存在~你也可以到『https://vbird.org.cn/download/index.php#webalizer』来下载文件!
| 0. 确认一些必须要的绘图相关
RPM 已经安装!
# 因为这个套件需要 gd, zlib 与 png 才行,所以,你需要安装这三个咚咚! # 在 Mandrake 9.0 当中,你所需要的套件在光盘中的名称为: libpng3-devel-1.2.4-3mdk libpng3-1.2.4-3mdk zlib1-1.1.4-3mdk zlib1-devel-1.1.4-3mdk libgd1-1.8.4-6mdk libgd1-devel-1.8.4-6mdk # 至于在 Red Hat 7.2 当中,你要的套件名称为: zlib-1.1.3-25.7 zlib-devel-1.1.3-25.7 libpng-devel-1.0.14-0.7x.3 libpng-1.0.14-0.7x.3 gd-1.8.4-4 gd-devel-1.8.4-4 # 请一定要安装喔!不然肯定无法安装这套软件的! 1. 下载软件:可以直接到官方网站,或者到我们网站上下载:
2. 安装软件,同样的,到
/usr/local/src 下面解压缩喔!
3. 设置档编修:
4. 测试 Run
的结果
[root@test etc]#
vi
/etc/crontab
|
接下来要测试啦,直接给他 http://your.host.name/webalizer 这个目录的最后面那个 webalizer 跟上面你设置的 Output 的目录有关,请依照你的主机刚刚的设置去规定他吧!结果呢?呵呵!你可以到我们的流量统计单去观察一下就知道啦!画面也是很不错的啰!
如此一来,你就可以很轻松的观察你的主机的任何信息啰!包括来自于其他地方的 IP ,网页浏览数等等的!很棒吧!
awstats 网页分析利器:
这套软件相当的不错!很棒,他提供了 CGI 程序运行与指令列模式运行,不过,我个人不太喜欢使用 CGI 的模式,所以我是使用指令列模式来进行这个程序的图形制作的!如果你是由官方网站下载新的版本来安装的话,那么底下的流程可能不是很适合你,目前我已经将一些需要修正的项目变更过,并且摆在我的网页上面,如果有需要的话,可以到『https://vbird.org.cn/download/index.php#awsats』来下载喔!
| 1. 下载软件:可以直接到官方网站,或者到我们网站上下载:
https://vbird.org.cn/download/index.php#awsats # 使用浏览器将网站上面提供的数据拿回去!当然,你也可以直接到官方网站上面去下载最新的版本! # 假设你已经将数据捉回去,并且放置在 /root 这个目录当中了,文件名为: awstats.tar.gz 2. 安装软件:
3. 设置档编修:
4. 修改一下
httpd.conf 的设置内容:
5. 测试 Run
的结果
6. 设置每日运行!
|
这样也就修改妥当啰!详细的图形示意图可以参考: http://awstats.sourceforge.net/cgi-bin/awstats.pl 相当的不赖吧!赶快试看看!
虚拟主机架设
- 什么是虚拟主机 ( Virtual Host )?
- 架设的大前提:
- 申请多个 host name 在 ISP 的管理上面;
- 自行设置经过合法授权的 DNS 主机来自行设置自己的 domain name !
- 实际架设:
- 已经设置好了三个 domain name ,分别是 mdk90.vbird.org, www.mdk90.vbird.org, phorum.mdk90.vbird.org ,此外,这三个网域的主网页个别放置在 /home/mdk90, /home/www.mdk90, /home/phorum.mdk90 ,亦即是:
- mdk90.vbird.org --> /home/mdk90
- www.mdk90.vbird.org --> /home/www.mdk90
- phorum.mdk90.vbird.org --> /home/phorum.mdk90
咦!虚拟主机是什么东西呐!怎么说的好像很神奇的样子呢?他有什么功能?为什么大家都想要玩一下虚拟主机呐?呵呵!所谓的虚拟主机,基本上,就是『让你的一部主机上面,有好多个"主网页"存在,也就是说,硬件实际上只有一部主机,但是由网站网址上来看,则似乎有多部主机存在的样子!』,举个例子来说好了,你可以由我的网页上面知道一件事情,那就是我的 WWW 主机其实只有一部,那就是 pc510.ev.ncku.edu.tw 。不过,我这部主机其实有很多个 Domain name 存在,例如 linux.vbird.idv.tw 与 phorum.vbird.idv.tw 这两个网址。不过,上面这两个网址其实也同时指到 pc510.ev.ncku.edu.tw 这部机器上面,亦即是 pc510.ev.ncku.edu.tw, linux.vbird.idv.tw, phorum.vbird.idv.tw 这三个不同的主机名称,其实都是指向同一部电脑主机!你可以在你的 Linux 机器上面以 nslookup 的指令搜索一下这三个主机名称,你就晓得为什么了!但是,当你在浏览器上面输入:
怪了!怎么会显示不同的网页内容呢?好像是存在三部主机对吧!呵呵!这就是所谓的虚拟主机啦!让你的一部机器上面,搞的好像好多部同的主机一样的一个简易的功能啦! ^_^
那么要架设虚拟主机需要什么咚咚呢?呵呵!以刚刚我的网站的结果为例,我要架设三个主网页,也就是必须要有多个 domain name 啰!对啦!这就是虚拟主机的大前提啦!『你必须要有多个主机名称,亦即是需要多个 domain name, FQDN 』,例如上面我就具有三个 domain name 啰!在需要多个 domain name 的情况下,你可以做的方式就是:
没错,就是这几个方法,因此,请确定你的主机名称已经搞定了!不然的话,怎么架设虚拟主机呢?您说是吧! ^_^
好了!又要来搞设置啦!又是 httpd.conf 这个文件啦!反正几乎只要跟 Apache 有关的,就是动这个文件就对啦!这里先来说一下我的大前提设置啰!
至于这个设置嘛!真的是很简单耶!只要几行就搞定了,设置完成之后还会让你偷笑ㄋㄟ~呵呵!看看实例吧!
[root@test root]# cd /usr/local/apache2/conf
[root@test root]# vi httpd.conf
# 在这个文件的最下方加入底下这些字眼!NameVirtualHost * # 设置你的虚拟主机判定的依据!这里是 * 亦即是
# 所有连上这部机器的名称都会被使用来当作虚拟主机的设置之用!<VirtualHost *>
ServerName mdk90.vbird.net
DocumentRoot /home/mdk90
</VirtualHost><VirtualHost *>
ServerName www.mdk90.vbird.net
DocumentRoot /home/www.mdk90
CustomLog /var/log/httpd/www.access_log combined # 特别将注册表额外分离出来
</VirtualHost><VirtualHost *>
ServerName phorum.mdk90.vbird.net
DocumentRoot /home/phorum.mdk90
</VirtualHost>
要注意的是:马上测试看看!呵呵!会发现,咦!我真的有三个主网页了哩!很不错吧!这个作法可以让你的 WWW 网页更有灵活度喔!举个例子来说,前一阵子因为酷学园讨论区(http://phorum.study-area.org) 常常挂点,所以鸟哥就自告奋勇的跟站长说,只要将 phorum.study-area.org 这个 domain name 指向我的主机 IP ,那么也可以直接进入我的讨论区,如此一来,只要修改一下 DNS 即可转换到我的讨论区啦!并且不需要再进行任何额外的设置!对于网页维护的灵活度是真的很有帮助的喔!
- 在虚拟主机的设置上还有很多的可用的功能,不过,最低的限度是需要有 ServerName 及 DocumentRoot 这两个即可!
- 虽然原来我就有 mdk90.vbird.net 这个网域,但是因为设置了虚拟主机之后,自己的原来名称可能会不见去,所以,这里必须将自己的名称也写入才行!
- 上面有发现一个 CustomLog 的设置喔!该设置会让以 www.mkd90.vbird.net 这个网域登录的注册表不再写入原来的 /var/log/httpd/access_log 文件,而是自行写入 /var/log/httpd/www.access_log 这个文件!
需要注意的事项:
虚拟主机并没有什么值得特别注意的地方,只要设置正确,大致上就不会有太大的问题!不过,你可能需要特别注意刚刚我们创建起来的新的注册表喔!为什么呢?我们上面不是提过说,注册表在大型的网站上面成长的幅度是很可观的吗?所以需要进行 logrotate ,但是你刚刚创建的文件并不在原本的 logrotate 文件之内呀!呵呵!这个时候请自行加入 logrotate 个手续喔!否则.....嘿嘿嘿嘿!硬盘空间被用光可不要怪鸟哥喔! ^_^
客户端的文本接口 Web 功能:
什么!?客户端竟然也有文本接口的浏览器?!哈哈!当然是有啦!不然这里干嘛要介绍?!那就是鼎鼎大名的 lynx 以及 wget 啰!请注意的是,这两个套件并不一定会在安装的时候就已经安装在你的系统中,所以请先使用 RPM 查找一下他是否存在于你的系统当中,然后才能运行喔!他的用途是: 这两个指令之前已经介绍过了!请自行前往观察一下啰!加油啦!
增强 PHP 代码运行速度的模块:
- 下载:
- 安装:
- 设置:
MM Cache 增强速度模块:
我们上面的介绍都是在于安装与架设 LAMP 服务器(Linux + Apache + MySQL + PHP ),不过,如果您曾经浏览过 PHP 的网页时,或许会发现:『咦!怎么 PHP 的速度慢慢的.....』,这是怎么一回事啊!?PHP 不是号称速度上面的反应是很快速的吗?怎么会慢慢的呢? 虽然 PHP 的程序已经很快了,但是因为电脑仅认识 0 与 1 的 binary file 来运行, 而由于 PHP 程序不需要编译即可通过 PHP 内核与其相关函数库来运行, 不过,如此一来还是多了一道手续,导致运行性能还是不比传统的经过编译的编程语言来的快(例如C编程语言之类的!)。 那怎么办?有办法加快 PHP 程序的速度吗?嗯!让我们先换个角度想,如果我们可以将 PHP 程序预先转换成为可直接运行的 binary file ,那么不就可以直接读取,进而加快速度吗? 没错!是这样~这东西称为预编器~ 其中, MM Cache 就是一个很不错的 PHP 预编器。 MM Cache 可以将您的 PHP 程序与 PHP 内核及相关函数库预先编译后暂存下来,以提供未来使用时,可以直接运行, 加上他可以优化您的 PHP 程序,因此,可以让您的 PHP 网页速度增快不少喔! MM Cache 啰!他的官方网站在:http://turck-mmcache.sourceforge.net/index_old.html。目前 MM Cache 已经出到了2.3.9 ( 2003/04/10 发布),不过,他仅在 PHP 4.1 以上版本以及 Apache 1.3 与 2.xx 版本测试过,如果你的 Apache 与 PHP 不是这些版本,那就抱歉啦!不一定可以使用的!不过,呵呵!我们上面提供的 Tarball 的安装方法本来就是这样的版本,所以您可以轻易的安装好 MM Cache 喔!废话不多说,赶紧来安装吧!
你可以在官方网站下载最新的版本(http://turck-mmcache.sourceforge.net/index_old.html),也可以在我们网站下载鸟哥试过的版本:
https://vbird.org.cn/download/index.php#www_mmcache
安装 MM Cache 真的是很简单喔!赶紧来安装吧!
| [root@test
root]# cd /usr/local/src
[root@test src]# tar -zxvf /完整路径/turck-mmcache-2.3.9.tar.gz # 会产生一个名为 turck-mmcache-2.3.9 的目录 [root@test src]# cd turck-mmcache-2.3.9 [root@test turck-mmcache-2.3.9]# phpize # 这个指令是 PHP 套件所提供的!可以建置好你的 mmcache 原代码 [root@test turck-mmcache-2.3.9]# ./configure --enable-mmcache=shared [root@test turck-mmcache-2.3.9]# make && make install # 这个动作会编译一个名为 mmcache.so 的动态函数库模块, # 并且会主动的将他安装在 /usr/lib/php4 这个目录当中! # 这样就安装完毕了!很简单吧! |
在 MM Cache 的设置方面需要更动两个地方,第一个是动态函数库加载的设置,第二个则是 PHP 的设置!
| 1. 设置主动加载动态函数库模块:
[root@test root]# vi /etc/ld.so.conf # 在这个文件内加入底下这一行: /usr/lib/php4 [root@test root]# ldconfig # 上面这两个步骤比较有趣一点,在 ldconfig 这个指令的功能是: # 『加载动态函数库到内存当中做为缓存』之用,至于加载的动态函数库则是 # 根据 /etc/ld.so.conf 这个文件的设置为准!这的动作只要第一次设置时进行 # 即可,未来在开机完成之后,系统会主动的加载动态函数库的! # 另外请注意, ld.so.conf 里面只要写『目录』即可! 2. 修改 php.ini # 请注意,由于每个人的 php.ini 都不相同,例如使用 RPM 安装者,应该是 # /etc/php.ini ,但是我上面的安装设置却是 /usr/local/php4/php.ini # 请依照您的主机来设置喔! [root@test root]# vi /完整路径/php.ini # 在这个文件的最后一行加入底下这几行: ;;;;;;;;;;;; ; MM Cache ; ;;;;;;;;;;;; extension="mmcache.so" mmcache.shm_size="16" mmcache.cache_dir="/tmp/mmcache" mmcache.enable="1" mmcache.optimizer="1" mmcache.check_mtime="1" mmcache.debug="0" mmcache.filter="" ; end of mmcache 3. 创建缓存目录: [root@test root]# mkdir /tmp/mmcache [root@test root]# chmod 0777 /tmp/mmcache 4.重新启动 Apache [root@test root]# /etc/rc.d/init.d/httpd restart # 或 [root@test root]# /usr/local/apache2/bin/apachectl restart |
Apache 的性能测试
事实上,安装 Apache 的时候,Apache 就已经提供了一个性能测试 ( benchmark ) 的软件了!那就是 ab 这个程序!怎么用呢?就直接用啊!
| [root@test
root]# /usr/sbin/ab [-dSk] [-c number] [-n
number] 网页.php
参数说明: -d :不要显示 saved table 的百分比数据;通常不要那个数据,所以会加 -d -k :还记得上面的 KeepAlive 吧!加入 -k 才会以这样的功能测试; -S :不显示长消息,仅显示类似 min/avg/max 的简短易懂消息! -c :同时有多少个『同时连接』的设置(可想成同时连接的 IP ) -n :同一个连接创建几个要求信道!(可想成同一个 IP 要求的几条连接) 更多的消息请自行 man ab 喔! 范例: [root@test root]# /usr/sbin/ab -dSk -c100 -n100 \ > https://vbird.org.cn/home.php This is ApacheBench, Version 1.3d <$Revision: 1.67 $> apache-1.3 Copyright (c) 1996 Adam Twiss, Zeus Technology Ltd, http://www.zeustech.net/ Copyright (c) 1998-2002 The Apache Software Foundation, http://www.apache.org/ Benchmarking
linux.vbird.org (be patient).....done
Document Path:
/home.php
Concurrency
Level: 100
Connnection
Times (ms)
|
这样就能够了解您的 Apache 性能了!因为我是在本机上面测试的,所以速度上面当然是很快啰!建议可以到远程同样使用 ab 来测试一下你的 Apache 性能,尤其是加上了 mm cache 之后,看看能不能增快速度呢? ( 注:这个 ab 程序对于读取 MySQL 之类的网页似乎没有办法成功的完成测试的样子,所以请不要使用 phpBB2 的网页来测试喔!尽量直接以 PHP 的网页来测试! ) 嘿嘿!
砍站软件与 Nimda 病毒的抵挡 scripts:
几个比较知名的网站管理员大概都有这样的困扰,那就是网站常被砍站软件所强力下载,结果造成主机的 CPU loading 过重,最后竟然会导致死掉~唉!真是的~人怕出名猪怕肥呐!先来解释一下什么是砍站吧!所谓的『砍站』,就是以类似多点连接下载的持续性消息传递软件进行网站数据的下载,而且,一激活该软件,该软件就将『整个网站』的内容都给他 download 下来,很厉害吧!没错!是很厉害,但是却也害死人了~怎么说呢?因为这种软件常常会为了加快 download 的速度,所以采用多点连接的方式,也就是会持续不断的向 Server 发出要求封包,而由于这些封包并不见得能够成功的让 Server 把数据传导给 Client 端,常常会无法投递就是啦!这样的结果就是.....造成 Server 要一直不断的回应,又无法正确的回应出去,此外,要求太过频繁,结果主机应接不暇,最后....就当机了...真的是林老师ㄌㄟ~我们这个小站的主机古早以前,就是因为这样的原因,导致服务常常断断续续的,并且,由于 CPU loading 太高,结果让正常连接进来看数据的网友没有足够的资源,因此网页打开的速度就变的很慢~唉~这些砍站的人,也太不道德啦!
由于这种砍站软件真的很麻烦,一不注意马上就又会被砍站而当机,三天两头就要重新开机一次,完全让 Linux 的稳定性无法发挥!真是气死了~后来,我就自行写了一个 scripts 来挡这样的 IP !我的作法是这样的:大致上就是这样吧!这样的一程序需要与 iptables 相互配合,所以,请先查阅一下简易防火墙设置那一篇文章,然后再来下载这支程序吧!这支程序您可以在底下的网址下载喔!
- 由于砍站软件要多点连续下载,因此,同一个 IP 在同一个时间内,会有相当多的连接发生;
- 由于他是重复不断的要求连接,因此刚刚创建的连接在达成下载的目的后,会立刻死掉,而又多生出其他的连接出来,因此,这个时候他的连接情况就变的相当的不正常了!
- 由于某些较旧的砍站软件并不会『欺骗』主机,所以,会在主机的注册表里面记录住 Teleport 的标记!
- 既然如此的话,那么我就让我的主机每分钟去检查两个东西(1)先检查 log file ,如果有发现到相关的 Teleport 字词,就将该 IP 抵挡掉;(2)使用 netstat 来检查同一个 IP 的同时连接,如果该连接超过一个值(例如同时有 12 个连接)的话,那么就将该 IP 抵挡掉!
- 此外,由于上面的方案可能会将 Proxy 的 Client 端也同时抵挡掉,真是可怜啊!这个时候,这支程序就会主动的将(1)的情况的主机抵挡 3 天,至于(2)的情况则抵挡2小时!过了该抵挡的时限后,该 IP 即可又连上我们的主机了!
https://vbird.org.cn/download/index.php#http-netstat.sh详细的安装步骤我已经以中文写在该文件里面了,所以请先查看一下该文件的前面说明部分吧!此外,Study Area 的 netman 大哥也已经开发了一套很棒的防砍站的程序了!在防堵砍站的原理上面是完全相同的,不过写法可能不是很雷同就是了!如果有需要的话,也可以前往 Study-Area 搜索一下啰!http://phorum.study-area.org/viewtopic.php?t=13643
安装 phpBB2 讨论板:
上面这样一路走来,哈哈!终于我们的 LAMP 服务器就已经大致上搞定啦!那么接下来你可以利用这个 WWW 主机帮你做什么事呢?嗄!能作的事情可多啰!目前很多支持 PHP 的架站软件已经被很完整的开发了,例如 PHPNuke 以及鸟哥很喜欢的 phpBB 呢!这些架站软件都是建构在 LAMP 上面的,而既然我们的 LAMP 已经搞定了,那么其他的架站软件的安装就真的是相当的快速呢!底下介绍 phpBB 的安装!你可以到底下的链接去看看喔:上面最后一个是鸟哥前一阵子写的,目前已经有出较新版本的 phpBB2 啰!所以,请记得到官方网站下载最新的 phpBB 来安装喔!毕竟比较新的不但功能比较多,而且臭虫(Bug)也清理的差不多了!另外,由竹猫星球的竹猫三兄弟也有出一本『phpBB 论坛架设宝典』,里面也有提到相当多的有用的架站心得与技巧的说明!有兴趣的可以先到竹猫星球看看其风格与内容,然后再考虑要不要架站吧! ^_^目前我对 phpBB 倒是蛮喜欢的!
- phpBB 官方网站:http://www.phpbb.com/
- phpBB 正体中文网站『竹猫星球』:http://phpbb-tw.net/phpbb/
- 简易 phpBB2 的安装与设置方法:https://vbird.org.cn/apache_packages/
问题讨论:
- 怪了!怎么我按照上面文章的设置,设置了底下的咚咚,但是却还是无法显示中文?为什么?
- 最简单的方法就是按下『Reload, 重新读入』,不过,因为有的浏览器是借由『比对网页数据与自己保存的 cache 数据是否相同』来做为 cache 更新的依据,而由于你仅修改了 httpd.conf 这个文件,对于网页并没有关系,因此,可能还是会显示出不正确的中文本喔!
- 再来的方法就是『改文件名称!』,既然名称已经跟硬盘的纪录不一样了,因此,该笔数据就会被重新读取,自然就会更新啰!
- 不过,最有效的方法,还是直接将你的浏览器内的高速缓存 ( Cache ) 清除掉就可以啦!以 IE 为例:点击『工具』选择『Internet 选项』,按下『删除文件』就可以啦!不过,如此一来,你曾经浏览过的网页的缓存数据同时也会被清除掉就是了!
AddDefaultCharset Big5
LanguagePriority tw en da nl et fr de el it ja ko no pl pt pt-br ltz ca es sv
答:
- 一般而言,按照上面的设置来编写 httpd.conf 这个文件的内容之后,就可以正确无误的显示中文本码才对~但是很多朋友还是来信说到,怪了!怎么会还是无法显示中文呢?研究了一下其中的原因,发现其实大家都有个错误的用法啦!就是因为,目前的浏览器上面都有所谓的缓存
( Cache ) 功能,这个功能主要会将浏览过的网页及其相关信息,例如图片、与最重要的网页的纪录等,先以文件的型态保存在电脑的硬盘中,若下次您在短时间内拜访该网站时,那么浏览器将会直接由硬盘
( Cache ) 将数据拿出来使用,所以就不会再次到远方读取数据!这可以节省相当多网络流量带宽,以及缩短等待的时间喔!不过,也由于如此,所以,你上次看到显示乱码的那个网页,也就会被保存在硬盘当中,因此,在你修改完成
httpd.conf 并且重新启动 Apache 之后,再次浏览该网页,仍然可能无法显示出正确的中文的啦!就是因为你曾经浏览过啦!那么要如何解决呢?
- 伤脑筋呐!怎么完全按照上面文章的方法,结果 Apache 与 MySQL 是启动了,但是 PHP 就是无法启动?害得我的 PHP 老是直接显示出原始的文件内容,而不是运行呢?
- 直接在你的 php 文件中,在 <? 的地方,都改写成 <?php 就可以啦!例如
- 如果不想要这么麻烦的话,可以直接修改 PHP 的设置档,亦即是 php.ini 这个文件,在我们上面文章的例子中,使用的是 /usr/local/php4/php.ini 这个目录下的文件,但如果是一般 distribution 提供的 PHP 的话,例如 Red Hat 8.0 ,那么该文件将会放置在 /etc/php.ini ,总之,请以搜索的指令找出该文件就对了!然后,以 vi 编辑该文件,找到 short_open_tag 那一段,将该设置改成:
- 如何解决出现 MySQL 的这个问题:
- 请先确认 MySQL 已经正确的启动当中(netstat -tl 找寻看看);
- 再确定 /tmp/mysql.sock 是否真的存在,若不存在,请使用 find / -name mysql.sock 找到这个文件,假设这个文件完整路径在 /var/lib/mysql/mysql.sock 好了;
- 再使用 mysqladmin -S /var/lib/mysql/mysql.sock -u root {其他参数} ...
- 测试结果应该都可以正确的启动了才对!
- 当我在启动 /etc/rc.d/init.d/httpd restart 时,总是会出现如下的问题:
答:
- 这个问题并不会存在于旧版的 PHP 当中,只有新版的
PHP 才有此一问题!这与 php.ini 的设置有关啦其实,与 Apache 的设置可就没有关系啦!解决的方法可以有两种方式:
| <?
phpinfo( ); ?> |
| <?php
phpinfo( ); ?> |
- short_open_tag = On
ERROR 2002: Can't connect to local MySQL server through socket '/tmp/mysql.sock' (111)
答:
- 这个问题多半出现在找不到
mysql.sock 这个文件,所以:
| [root@test
root]# /etc/rc.d/init.d/httpd restart
Stopping httpd: [ OK ] Starting httpd: perl: warning: Setting locale failed. perl: warning: Please check that your locale settings: LANGUAGE = "en", LC_ALL = "en", LANG = "en" are supported and installed on your system. perl: warning: Falling back to the standard locale ("C"). |
答:
- 因为您的 apache 有使用 perl
的模块,偏偏 perl 模块会读取 locale 这个咚咚的变量,这个 locale 应该就是跟语言有关的一些环境变量咯!而我们语言的环境变量与
i18n 有关,也就是在 /etc/sysconfig/i18n 里面的设置咯!如果是在 Red
Hat 9 的系统中,与 i18n 有关的设置值在:『/usr/share/i18n/locale』当中,这里面有一些我们惯用的语言存在!一般来说,我们的语言通常缺省为中文(zh_TW)或者是英文(en),但是在
/usr/share/i18n/locale
当中并没有 en 存在(我的 red hat 9 没有...),所以这个时候要以 en_US (因为是美语啊!)来设置即可!如何设置呢?
| [root@test
root]# vi /etc/sysconfig/i18n
LANG="en_US" LANGUAGE="en_US" LC_ALL="en_US"; export LC_ALL SUPPORTED="zh_TW.Big5:zh_TW:zh:en_US.UTF-8:en_US:en" SYSFONT="latarcyrheb-sun16" |
课后练习
- 请问 LAMP 这个服务器代表什么意思?
- Apache 的设置档文件名一般为何?
- 在 Apache 的设置档当中,哪一个参数是用来设置『主网页』的?
- 哪一个指令用来重新启动与关闭 Apache ?(请以 Tarball 安装的方法来说明)
- 当我使用 ps -aux 的时候,发现好多的 httpd... 的进程,这是正常的吗?!最多可以有几个进程是在那个文件的那个参数所设置的?!
- 又,呈上题,这些进程 (process) 的 owner 与 group 是谁?该察看那个设置档的那个参数?
- 如果今天我以 http://your.ip 结果却发现浏览器出现类似 FTP 的画面(会列出该目录下的所有文件),这是什么原因造成的?该如何避免?
- 在 Apache 里面, .htaccess 这个文件的功能为何?
前往参考用解答
2003/01/14:第一次完成
2003/01/18:添加问题讨论:关于中文的说明
2003/01/21:添加问题讨论:关于 PHP 无法使用的问题说明
2003/04/28:加入砍站软件的程序说明
2003/04/29:加入 PHP 原代码程序优化模块 MM Cache 说明。
2003/05/07:加入 ab 这个性能测试的说明!
2003/05/30:使用 Tarball 安装时常常发生一些困扰,加入 User/Group
2003/09/10:将原本在 2002/12 安装 Tarball 的套件更新为目前 2003/09 最新的版本来安装喔! 2003/10/02:加入一些问题的克服之道喔!
2004/03/25:修订 MySQL 安装的流程!第四步骤加入权限的修订!
2004/09/03:修改了 MMCache 的主网页。

